


AssemblyScript Asteroids
October 2, 2020
This was the first WebGL game I wrote in AssemblyScript. Given there were no WebGL bindings that predated ASWebGLue , it is possibly the first WebGL game ever written in AssemblyScript. It is a simple Asteroid shooter game I wrote to demonstrate the WebGL binding code I wrote. This is a quick walkthrough of that code.
Note: The project on Github uses files with a .asc extension. I will eventually change the file extensions to .ts, which is currently the AssemblyScript standard.
WebGL Bindings
I am currently working on WebGL bindings for the AssemblyScript language.
These bindings are a work in progress, and the entire WebGL has not yet been
implemented in AssemblyScript. If you would like to look at the status of the
AssemblyScript WebGL bindings project, please take a look at the following
GitHub URL:
https://github.com/battlelinegames/ASWebGLue
I do not currently have an npm package for this project. I want to wait until the
bindings are closer to completion. If you would like to use the WebGL bindings
for your project, you will need to include the ASWebGLue.js and webgl.ts files
in your project and import them as modules into your JavaScript and AssemblyScript
code.
Note: @surma has developed WebGL bindings that use the
WebAssembly Reference Types
proposal's
externref
ASWebGLue.js
ASWebGLue.js is the JavaScript glue code file. It adds functions to the import
object passed to the WebAssembly module. It also adds array data to track
JavaScript objects required by WebGL. When AssemblyScript code makes function
calls, the WebAssembly passes integer indexes to the JavaScript functions. The
code uses these as indexes into an array that tracks the JavaScript object so
that the code can pass it to WebGL. For example, when AssemblyScript creates a
WebGL program object, it receives a number, an index into the programArray.
Any function call to WebGL that requires a program object will pass this
integer to the JavaScript glue code.
https://github.com/battlelinegames/AssemblyScriptAsteroids/blob/master/src/ASWebGLue.js
webgl.ts
The webgl.ts file contains all of the function declarations for the imported
JavaScript glue code. These functions correspond with WebGL functions in
JavaScript and allow you to make WebGL calls from AssemblyScript.
https://github.com/battlelinegames/AssemblyScriptAsteroids/blob/master/src/webgl.asc
Asteroids Game Code
The AssemblyScript WebGL bindings are not complete, but they are ready for some simple game code. Thefirst game I wrote to begin testing the AssemblyScript WebGL binding code is a simple clone of the early Atari game Asteroids. The game is not fully featured but intended to demonstrate one type of game written using the bindings as they exist in September of 2020. I plan to fully flesh out and test WebGL in AssemblyScript over the next few months. This is a code walkthrough of the version of this game available on github: https://github.com/battlelinegames/AssemblyScriptAsteroids . It was originally intended as a tutorial, but became an in depth explanation of the code as of 10/1/2020. My goal is to create a series of AssemblyScript WebGL tutorials and make them available at WasmBook.com . You can play the game online at https://embed.com/wasm/asteroid/. If you have any questions or comments on the code or this document, please contact me on twitter: https://twitter.com/battagline (@battagline) or on the AssemblyScript discord channel: https://discord.gg/assemblyscript. Special thanks to @torch2424 (Aaron Turner) for his help and the awesome music and sound for the game!
AsteroidsGame.js
The WebAssembly module compiled by AssemblyScript must be loaded and initialized using the WebGL glue code in the ASWebGLue.js file. This JavaScript file imports the initASWebGLue and ASWebGLReadyfunctions from ASWebGLue.js. It creates a last_time variable used for tracking the time between frame renders. The exports object will contain all of the functions exported by the WASM module. Here is the code at the beginning of the file:
  import { initASWebGLue, ASWebGLReady } from './ASWebGLue.js';

    // The last_time variable is used to track the time between frame renders.
    var last_time = 0;

    // The exports object contains the functions exported from the WASM module
    var exports = {};
The next batch of variables are booleans set to the state of the keys pressed in the game. These are the left, right, up, and down arrow keys as well as the space bar:
  var leftKeyPress = false;
  var rightKeyPress = false;
  var upKeyPress = false;
  var downKeyPress = false;
  var spaceKeyPress = false
The next group of variables will be used as Audio objects later in the game.
  // The Audio objects
  var song;      // (1)
  var laser;     // (2)
  var explosion; // (3)
The three lines above are the global variables that will hold Audio objects.
These are for the
song
(1)
sound,
laser
(2)
sound, and
explosion
(3)
sound. The
song
will play in a loop, and the other sounds will play when the player fires a
laser
or destroys an asteroid. After defining the audio variables, I define a function
capturing the
keydown
event. This function sets the
keypress
flags we defined earlier. At the end of this function, it plays the song loop if
it is not currently playing. That code starts up the sound loop when the player
presses a key for the first time.
  document.addEventListener('keydown', (event) => { // (1)
    if (event.code == 'ArrowLeft') { // (2)
      leftKeyPress = true;
    }
    if (event.code == 'ArrowUp') { // (3)
      upKeyPress = true;
    }
    if (event.code == 'ArrowRight') { // (4)
      rightKeyPress = true;
    }
    if (event.code == 'ArrowDown') { // (5)
      downKeyPress = true;
    }
    if (event.code == 'Space') { // (6)
      spaceKeyPress = true;
    }

    // The sound will not be started until the first key is pressed.
    if (song.ready == true) { // (7)
      song.start(0); // (8)
      song.ready = false; // (9)
    }
  });
The code above captures the
keydown
(1)
event. It looks for the
ArrowLeft
(2)
,
ArrowUp
(3)
,
ArrowRight
(4)
,
ArrowDown
(5)
, and
Space
(6)
event code and sets the appropriate flag. After capturing the key status of the
keys used by the game, the function checks the
song.ready
(7)
flag, and if it is ready, the song is started
(8)
and the
song.ready
(9)
flag is set to
false
. The code does this to begin playing the song as soon as the player hits a key.
After capturing the
keydown
event to set the key press flags to true, we need to set the key flags to
false
if the code released the key with a
keyup
event:
  document.addEventListener('keyup', (event) => { // (1)
    if (event.code == 'ArrowLeft') { // (2)
      leftKeyPress = false;
    }
    if (event.code == 'ArrowUp') { // (3)
      upKeyPress = false;
    }
    if (event.code == 'ArrowRight') { // (4)
      rightKeyPress = false;
    }
    if (event.code == 'ArrowDown') { // (5)
      downKeyPress = false;
    }
    if (event.code == 'Space') { // (6)
      spaceKeyPress = false;
    }
  });
The previous block of code captures the
keyup
(1)
event. It looks at
event.code
, and if the code is
ArrowLeft
(2)
,
ArrowUp
(3)
,
ArrowRight
(4)
,
ArrowDown
(5)
or
Space
(6)
, the appropriate key flag is set. Now we need to write a function to call every
time the browser renders a frame. The function will calculate the time difference
between this render and the previous frame render. It will call the
LoopCallback
function exported by the WASM module. Then it will call the
requestAnimationFrame
on the render function so that the browser calls the render function on the next
frame render.
  function renderFrame() { // (1)
    // calculate the time difference between this render and the previous render
    let delta = 0;
    if (last_time !== 0) {
      delta = (new Date().getTime() - last_time); // (2)
    }
    last_time = new Date().getTime(); // (3)

    // call the LoopCallback function in the WASM module
    exports.LoopCallback(delta, // (4)
                        leftKeyPress, rightKeyPress,
                        upKeyPress, downKeyPress,
                        spaceKeyPress);

    // requestAnimationFrame calls renderFrame the next time a frame is rendered
    requestAnimationFrame(renderFrame); // (5)
  }
The above code defines the
renderFrame
(1)
function. The function calculates the time
delta
(2)
(time difference between this render and the previous). It also sets the
last_time
(3)
variable so that the code can calculate the time delta in the next frame render.
The
renderFrame
function calls
LoopCallback
(4)
inside of the WASM module. Finally, the code calls
requestAnimationFrame
(5)
passing the
renderFrame
. That calls
renderFrame
the next time JavaScript renders a frame.
Next, I will define the
getAudio
function, which will call the
getAudioSource
function several times to load all of the sound files I will be using for this
game.
  // load audio filesasync
  function getAudio() { // (1)
    song = new Audio('./audio/song-hq.mp3'); // (2)
    song.loop = true; // (3)
    song.addEventListener("canplaythrough", event => {
      song.ready = true; // (4)
    });

    laser = new Audio('./audio/laser.mp3'); // (5)
    laser.addEventListener("canplaythrough", event => {
      laser.ready = true;
    });

    explosion = new Audio('./audio/explosion.mp3'); // (6)
    explosion.addEventListener("canplaythrough", event => {
      explosion.ready = true;
    });
  }
The
getAudio
(1)
function creates three
Audio
(2)
objects for the
song
,
laser
, and
explosion
sounds. The song is played in a loop, because the
loop
(3)
variable on the song object is true. Each sound has a flag that tells the game
the sound is
ready
(4)
to play, set on the
canplaythrough
event. After creating the
Audio
object for the song, I create an
Audio
object for the
laser
(5)
and the
explosion
(6)
in the same way.
Finally, the startGame function initializes the game.
  // the startGame function calls initASWebGLue and instantiates the wasm module
  export function startGame(wasm_file) { // (1)
    // load the audio when the game is started.
    getAudio(); // (2)
    const memory = new WebAssembly.Memory({ initial: 100 }); // (3) linear memory
    var importObject = {
      env: {
        memory: memory,
        seed: Date.now,
        playLaser: function () { // (4)
          if (laser.ready === true) {
            laser.play(); // (5)
          }
        },
        playExplosion: function () { // (6)
          if (explosion.ready === true) {
            explosion.play();
          }
        },
      }
    };

    initASWebGLue(importObject); // (7)

    (async () => {
      // use WebAssembly.instantiateStreaming in combination with
      // fetch instead of WebAssembly.instantiate and fs.readFileSync
      let obj = await WebAssembly.instantiateStreaming( // (8)
        fetch(wasm_file),
        importObject);
      exports = obj.instance.exports;
      ASWebGLReady(obj, importObject); // (9)
      requestAnimationFrame(renderFrame); // (10)
    })();
  }
The
startGame
(1)
function initializes everything the asteroid game needs to run. It takes in the
wasm_file
as a parameter, which we will initialize. This WASM module is the output of the
AssemblyScriptcompiler, and after initializing it from this JavaScript file, we
will run a function in the module that executes the game. WebAssembly can not play
sounds directly. I need to load and execute the sound files from JavaScript. The
startGame
function calls the
getAudio
(2)
function to load the audio files. I call
WebAssembly.memory
(3)
with an initial memory allocation of 100 pages. That creates a memory object passed
to WebAssembly through the
importObject
. The
playLaser
(4)
function plays the laser sound when the player fires the space ship’s laser. Defining
it inside of the
importObject
allows us to access it from AssemblyScript. If the laser is ready to fire, the
playLaser
function calls
laser.play()
(5)
to play the sound. The
playExplosion
(6)
works the same way that the playLaser function. The code calls
initASWebGLue
(7)
passing the
importObject
, which adds the necessary WebGL glue functions into the
importObject
before the code instantiates the WebAssembly module. Then inside of an asynchronous
IIFE, the
WebAssembly.instantiateStreaming
(8)
function is called, passing in the
importObject
. After instantiating the module, I set the
exports
to the
obj.instance.exports
object returned by
instantateStreaming
. The code calls the
ASWebGLReady
(9)
function passing the
importObject
. That allows the glue functions to access the real-time type information, to retrieve
values from linear memory. Finally, the code calls
requestAnimationFrame
(10)
passing the
renderFrame
function, which will execute
renderFrame
the next time the browser renders a frame to the canvas. The code is on GitHub
at the following url:
https://github.com/battlelinegames/AssemblyScriptAsteroids/blob/master/src/AsteroidsGame.js
The AssemblyScript
The following files define the game as much as is possible from within WebAssembly. I am not going to go into details about the AssemblyScript bindings and glue code. You will need to import the WebGL functions you use, but it is my goal to create a complete set of bindings so that using WebGL from AssemblyScript is as similar to using WebGL from TypeScript as is possible. You will need to get files from the ASWebGLue project on GitHub.
Vector.ts
The
Vector
class is a 2D vector with an x and y attribute and a set of methods to find the
magnitude, the squared magnitude. There are other methods that copy, normalize,
multiply, and add vectors. There is also a function to determine the angle of a
2D vector.
  export class Vector {
    public x: f32 = 0.0; // (1)
    public y: f32 = 0.0;

    constructor( x: f32 = 0.0, y: f32 = 0.0) { // (2)
      this.x = x;
      this.y = y;
    }

    // get the magnitude (length) of a vector
    public magnitude() : f32 { // (3)
      return Mathf.sqrt(this.x * this.x + this.y * this.y);
    }

    // get the squared magnitude of a vector
    public magSq():f32 { // (4)
      return this.x * this.x + this.y * this.y;
    }

    // normalize a vector by giving it a specific length (default of 1)
    public normalize(magnitude: f32 = 1.0): Vector { // (5)
      let len: f32 = this.magnitude();
      if( len == 0 ) {
        // don't want to divide by 0
        return this;
      }
      this.x /= len;
      this.y /= len;
      this.x *= magnitude;
      this.y *= magnitude;

      return this;
    }

    // copy the values in a second vector to this vector
    public copy( second : Vector ): void { // (6)
      this.x = second.x;
      this.y = second.y;
    }

    // multiply the vector by a scalar value
    public multiply(scalar: f32): void { // (7)
      this.x *= scalar;
      this.y *= scalar;
    }

    // add a second vector to this vector
    public add(value: Vector): void { // (8)
      this.x += value.x;
      this.y += value.y;
    }
 }
This Vector class represents a 2D vector and provides us with several
useful functions for vector math. It has two attributes which are the x and y
coordinates. The constructor takes an x and y parameter
and uses them to set the x and y attributes of this vector. The magnitude
(3) function uses the Pythagorean Theorem to find the length of
a line from (0,0) to (x,y). That length is the magnitude of the current vector.
The magSq(4) function returns the squared magnitude of
the vector. The normalize(5) function sets the magnitude
of the vector to a new value, or a value of 1.0 if no value is passed to the function. The
copy(6) function takes a second vector and copies the x
and y values from the parameter vector to this vector. The multiply
(7) function multiplies the x and y attributes of this vector by the
scalar value passed in as a parameter. Finally, the add(8)
function takes a parameter vector and adds the parameter’s x value the
this.x and the parameter’s y attribute to this.y.
https://github.com/battlelinegames/AssemblyScriptAsteroids/blob/master/src/Vector.asc
Renderer.ts
The Renderer class will contain all of the calls to the WebGL bindings.
It will need to import all of the functions it will call inside of the webgl.ts file,
which contains the AssemblyScript WebGL bindings. We willdefine the shader code in
this class and use it to compile and link our shader program. The renderer will be
able to clear the canvas and render line loops to the canvas. The code in Renderer.ts
will first need to import several functions from webgl.asc and the Vector
class from Vector.ts.
  import {
    WebGLShader, shaderSource, createShader, compileShader,
    VERTEX_SHADER, FRAGMENT_SHADER, createProgram, WebGLProgram,
    attachShader, useProgram, WebGLUniformLocation, getUniformLocation,
    uniform4fv, uniform2fv, uniform1f, linkProgram, WebGLRenderingContext,
    createBuffer, WebGLBuffer, ARRAY_BUFFER, LINK_STATUS, COMPILE_STATUS,
    STATIC_DRAW, GLint, FLOAT, LINE_LOOP, COLOR_BUFFER_BIT,
    enableVertexAttribArray, bindBuffer, createContextFromCanvas,
    getProgramInfoLog, getShaderInfoLog, clearColor, clear,
    bufferData, getAttribLocation, drawArrays, getShaderParameter,
    vertexAttribPointer, GLuint,
  } from './webgl';

  import {Vector} from './Vector';
After importing the Vector class and the functions and types, I need to define the vertex and fragment shaders. Shaders are the heart of WebGL. Most calls to WebGL are to configure and load data into the shaders.
Shaders
WebGL uses the GLSL ES shader language, and our shaders will be using version 3.00 of GLSL ES. Thereare two types of shaders we will need to compile and link into a WebGLProgram object. These are a vertex shader and a fragment shader. The vertex shader processes the data associated with each vertex of the geometry you would like to render. The vertex shader then feeds data to a fragment shader, which determines the color of the pixel. WebGL sends data to the shaders in the form of attributes and uniforms. Attributes are data associated with each vertex such as x, y, z, color, etc. Uniforms are constants across allvertex and pixel data. It may be something like camera position, but uniform values do not change based on the vertex or fragment the shader is processing. The vertex shader can only access the attributes of the current vertex. However, it can access all of the uniform data. GPUs are highly parallel so that different attribute data is likely to run on different threads.
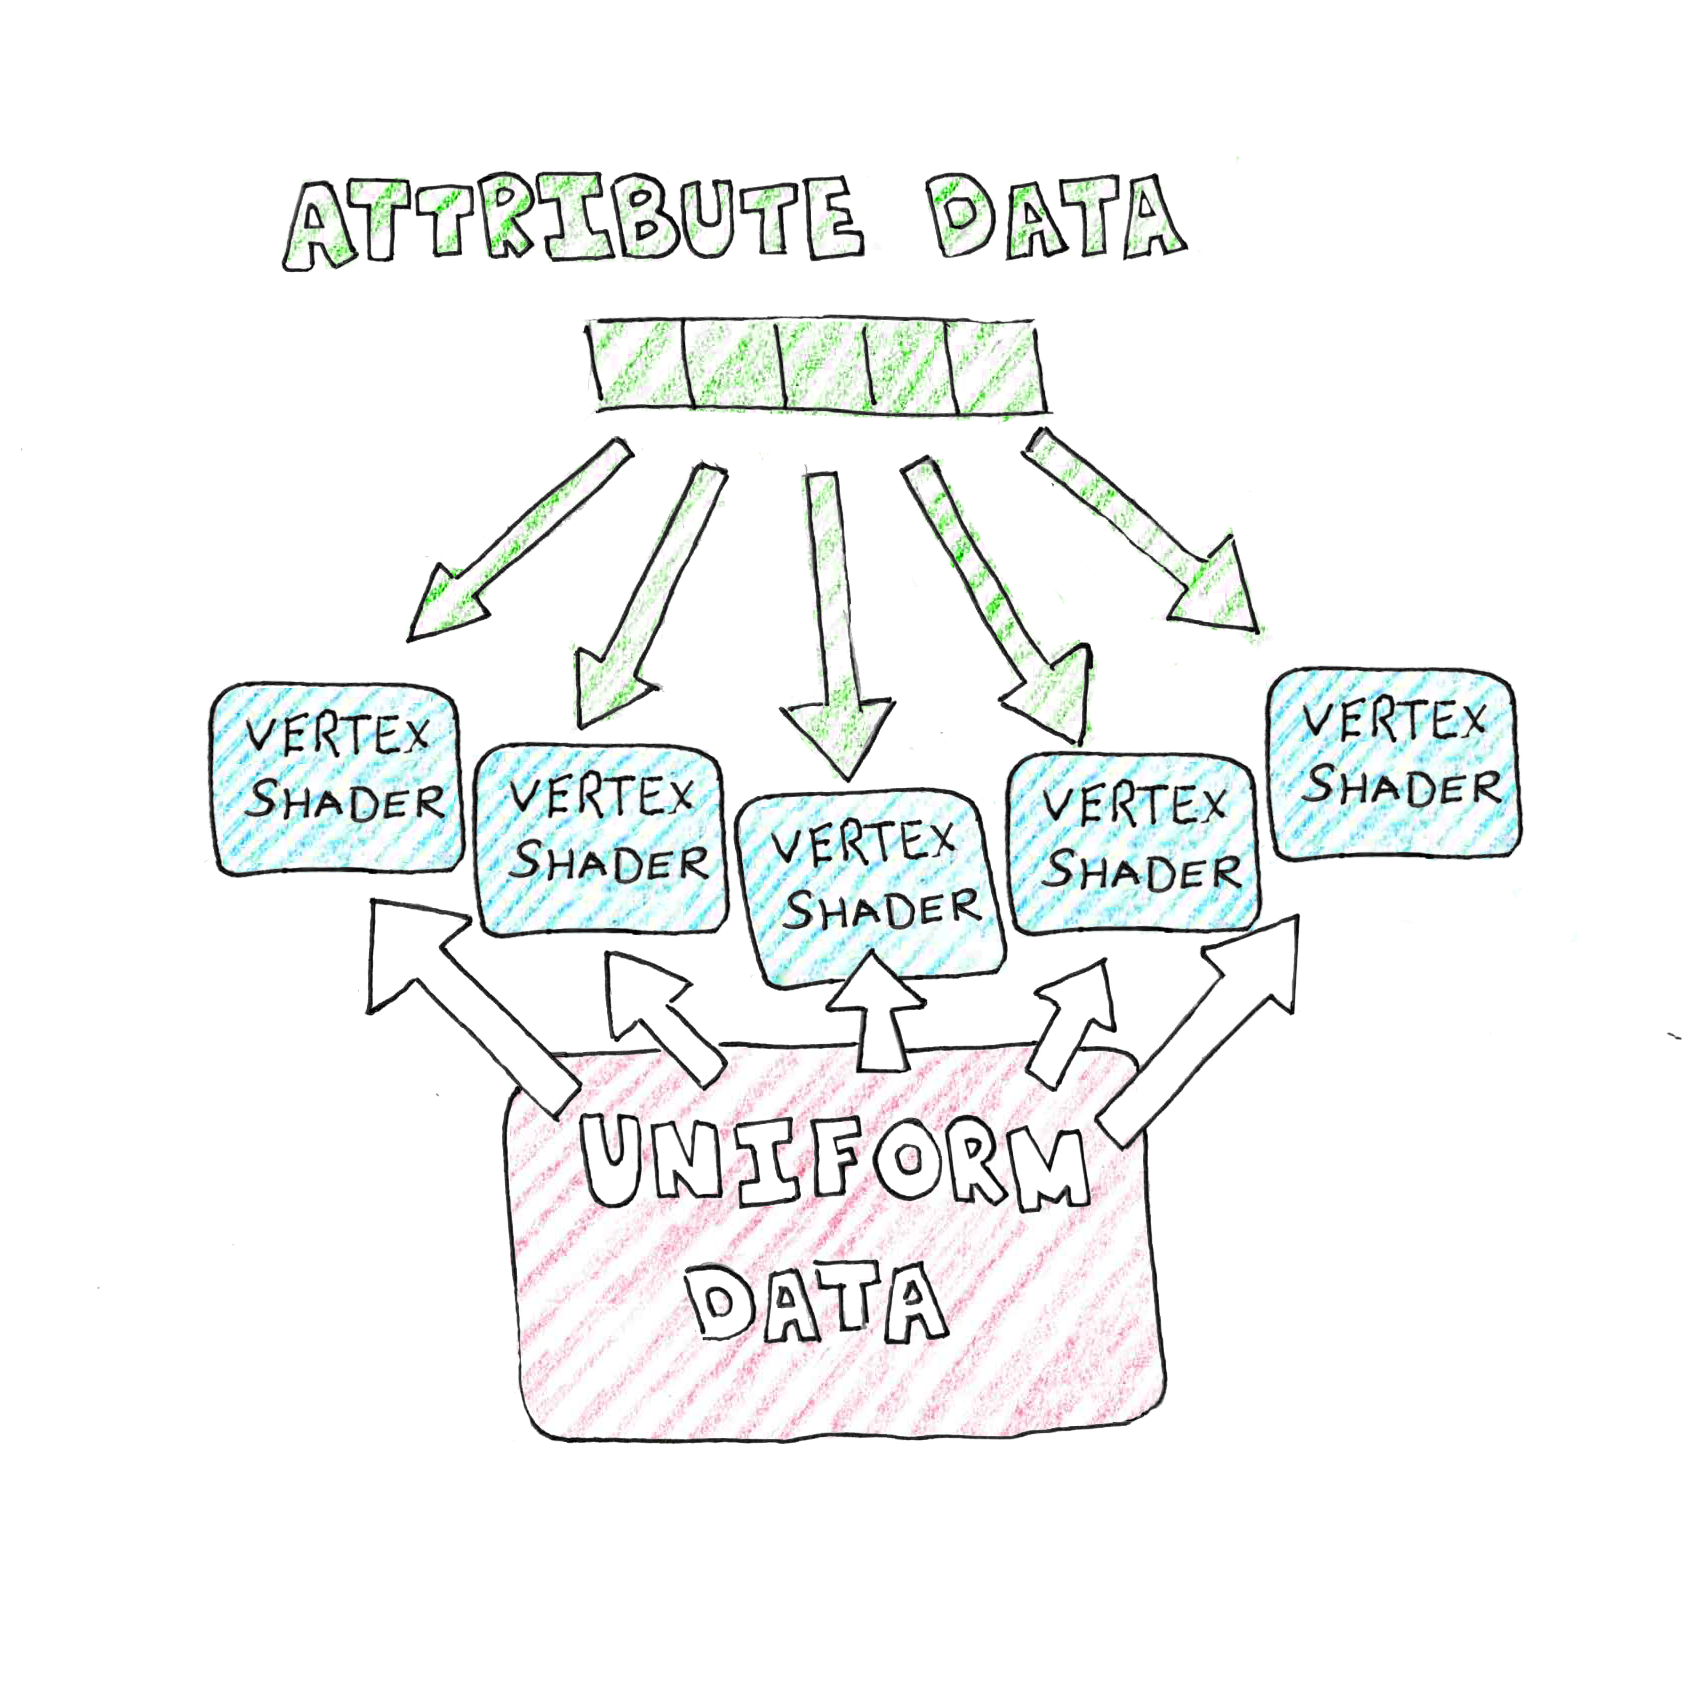
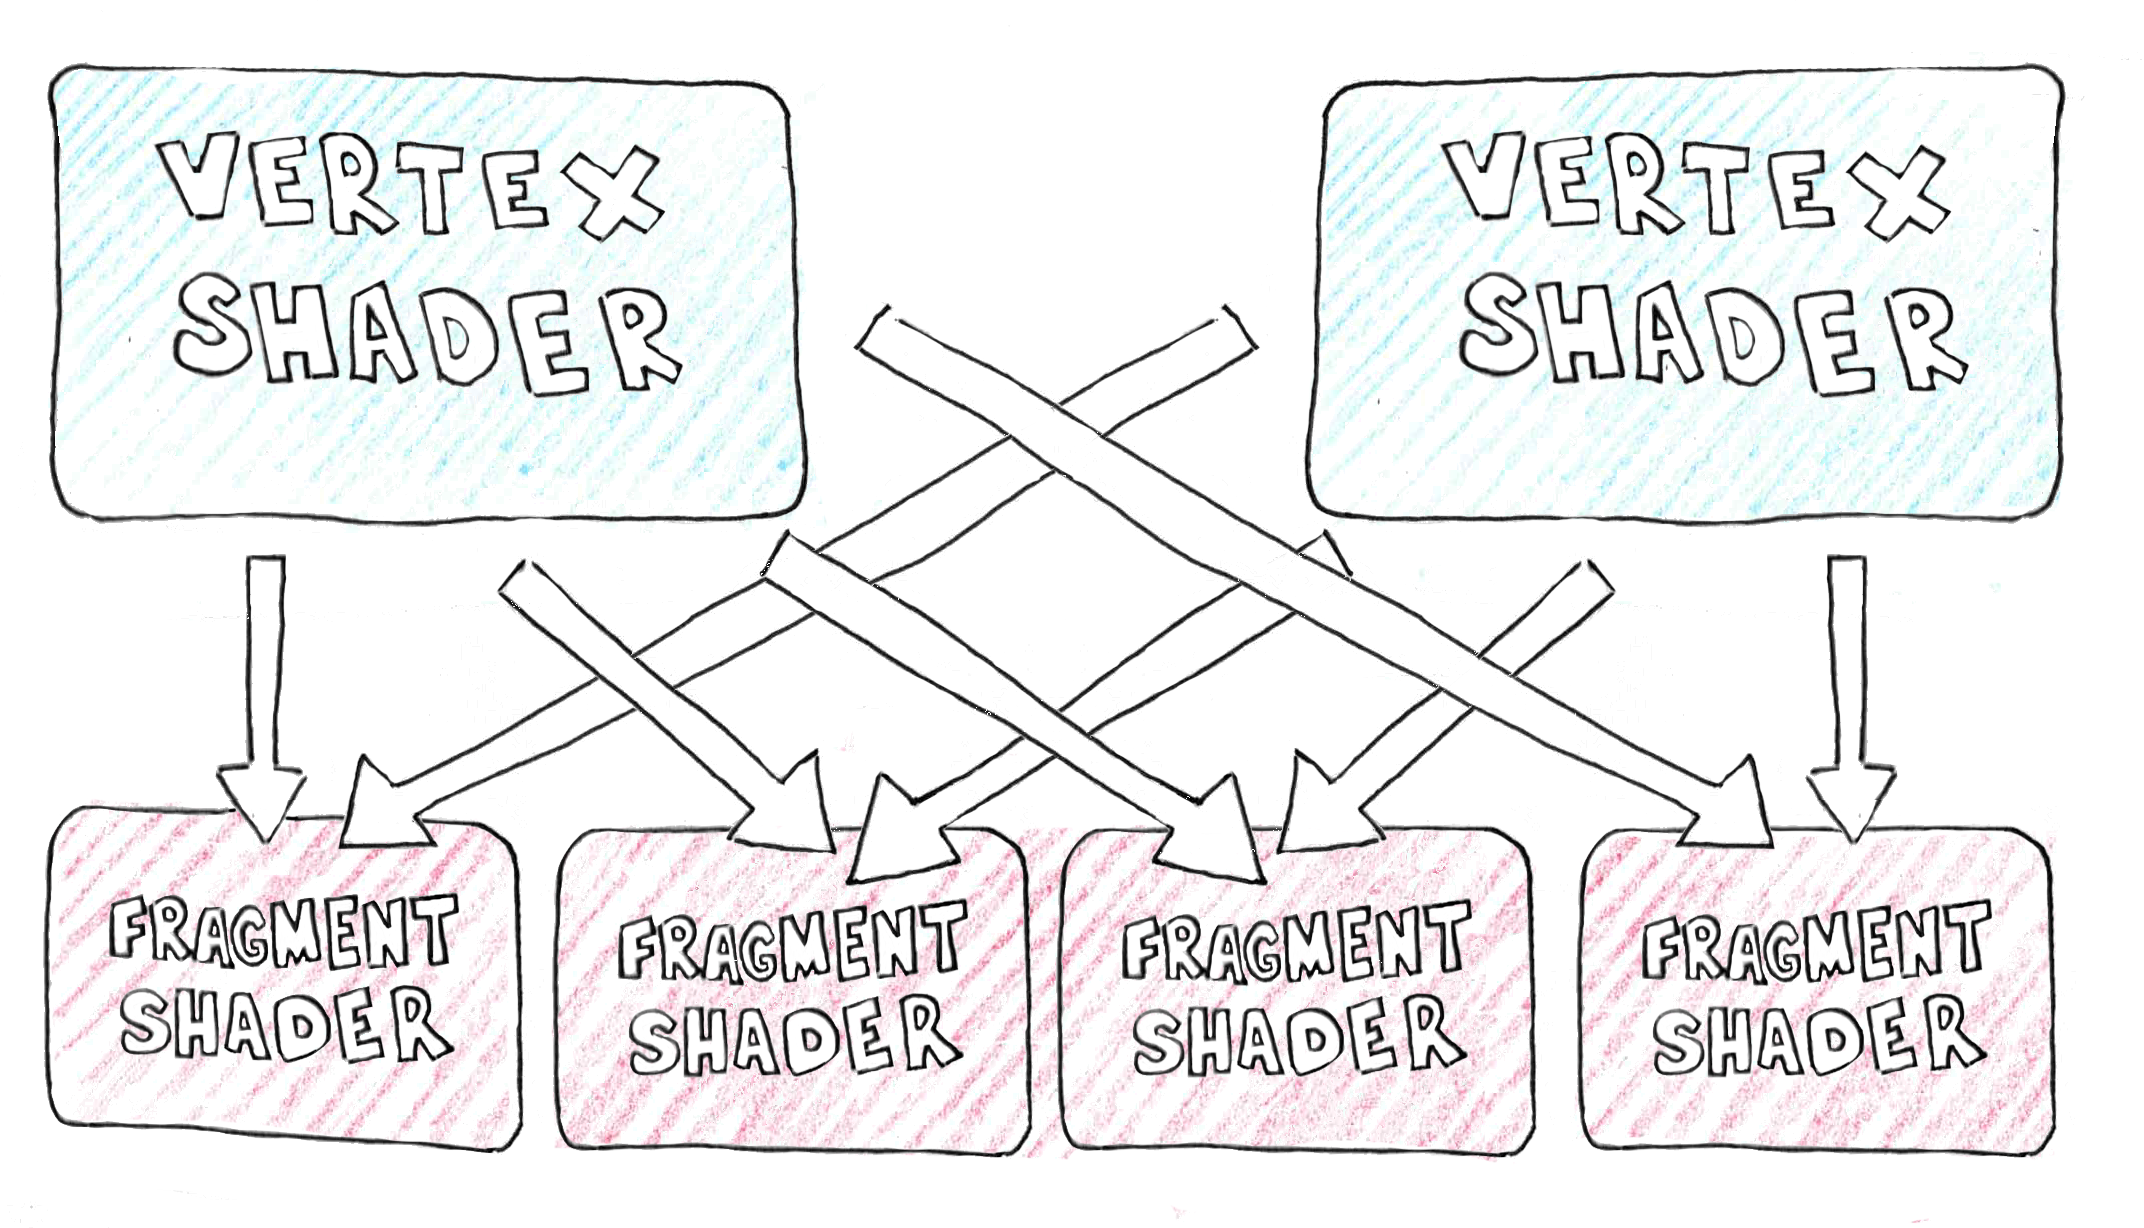
Each vertex shader then feeds multiple fragment shaders, interpolating values between the different vertices.
The vertex and fragment shader I wrote for this game are pretty simple. It supports basic 2D line drawing. The positional values for WebGL range from -1.0 to 1.0. An x value of -1.0 will be on the far left of the canvas, and 1.0 will be on the far right of the canvas no matter what size your canvas is. Similarly, a y valueof 1.0 will be on the top of the canvas and -1.0 on the bottom. It works that way because I am always using a z value of 0.0 (this is a 2D game). Let’s go ahead and take a look at the vertex shader code found in the Render.ts file.
Vertex Shader
The shaders are stored in strings inside of our AssemblyScript. The WebGL will take those strings and use them to compile and link a shader program. The first of these strings is the vertex shader, which I define using an AssemblyScript template string:
  const V_COLOR_LINE_SHADER:string = `#version 300 es
    precision highp float;

    uniform uint u_color; // (1)
    uniform float u_scale; // (2)
    uniform float u_rotation; // (3)
    uniform float u_loop_x; // (4)
    uniform float u_loop_y;

    in vec2 position; // (5)
    out vec4 c; // (6)

    void main() {
      vec2 pos = (position * u_scale); // (7)
      float cosine = cos(u_rotation); // (8)
      float sine = sin(u_rotation);
      float x = (cosine * pos.x) + (sine * pos.y);
      float y = (cosine * pos.y) - (sine * pos.x);

      pos.x = x + u_loop_x; // (9)
      pos.y = y + u_loop_y;

      gl_Position = vec4( pos, 0.0, 1.0 ); // (10)
      uint mask = uint(0xff);

      // convert 32-bit hexadecimal color to four float color
      uint red = u_color >> 24;
      uint green = (u_color >> 16) & mask;
      uint blue = (u_color >> 8) & mask;
      uint alpha = u_color & mask;

      c = vec4( float(red) / 255.0,
                float(green) / 255.0,
                float(blue) / 255.0,
                float(alpha) / 255.0 );
    }
The first line of the string, #version 300 es, tells the shader that
we are using GLSL ES version 3.00. The line precision highp float sets
the precision of the float type to high. The u_color(1)
uniform variable defines the color of the loop we are rendering. The uniforms
u_scale (2) and u_rotation
(3) scales and rotates the loop. The u_loop_x
(4) and u_loop_y variables define the x and y
position of the entire loop. I will use these to adjust the position
(5) of each vector position attribute. The output of this
vertex shader will include a color value in the out vec4 c output variable.
Like in C, the main function is where the code begins to execute when the shader runs.
The shader multiplies the position attribute by the u_scale
(7) uniform. The shader scales the entire loop by the same
amount. After scaling the point, the sine and cosine values for the u_rotation
(8) angle are calculated and used to adjust the x and y values.
The position x and y values are then adjusted by the u_loop_x
(9) and u_loop_y values, representing the loop’s x
and y position. The shader sets the built-in variable gl_Position
(10) to the output of the transformation. The color uniform value
u_color is a 32-bit color value where the four bytes represent the red, green,
blue, and alpha color channels. The color output from the fragment shader must be four
floating-point values from 0.0 to 1.0. The last thing the vertex shader does is convert the
32-bit color value into four floating-point values to set the output color c variable to be
passed to the fragment shader.
Fragment Shader
After the vertex shader, I define an extremely simple fragment shader. The fragment shader determines therendered pixel color. This fragment shader passes the color value from the vertex shader back out as the pixel color. Here is that code:
const F_SHADER:string = `#version 300 es
precision highp float;
in vec4 c;
out vec4 color;
void main() {
color = c;
}
`;
Render Class
The beginning of the Renderer class has several attributes listed below:
export class Renderer {
  public static SN: Renderer; // (1) SINGLETON
  public static DELTA: f32; // (2)

  public color_line_program:WebGLProgram; // (3)
  public color_location:WebGLUniformLocation; // (4)
  public scale_location:WebGLUniformLocation;
  public rotation_location:WebGLUniformLocation;
  public offset_x_location:WebGLUniformLocation;
  public offset_y_location:WebGLUniformLocation;

  public buffer:WebGLBuffer; // (5)
  public position_al: Glint; // (6)
  public gl:WebGLRenderingContext; // (7)
The first two attributes are static. The SN(1)
attribute is a singleton for the Renderer class. The code can then access
this Renderer using Renderer.SN. The
DELTA(2) attribute is a floating-point value representing the number
of seconds between frames. After that, there is a variable called color_line_program
(3), which is a WebGLProgram. There are five
WebGLUniformLocation(4) variables that allow the
Renderer to update the uniform values in the WebGLProgram.
A WebGLBuffer named buffer(5) is defined
after the uniform locations, along with the position attribute location
position_al(6). Finally, there is a
WebGLRenderingContext called
gl(7).
Constructor
The constructor needs to create the WebGLContext object, compile and link the
WebGLProgram object (the shader), and retrieve the uniform location from the
WebGLProgram object. Here is the constructor code:
constructor() {
if( Renderer.SN == null ) {
Renderer.SN = this; // (1)
}
this.gl = createContextFromCanvas('cnvs', 'webgl2'); // (2)
let color_line_vertex_shader: WebGLShader = createShader(this.gl, // (3)
VERTEX_SHADER);
shaderSource(this.gl, color_line_vertex_shader, V_COLOR_LINE_SHADER);
compileShader(this.gl, color_line_vertex_shader);
let fragment_shader: WebGLShader = createShader(this.gl, FRAGMENT_SHADER);
shaderSource( this.gl, fragment_shader, F_SHADER);
compileShader( this.gl, fragment_shader );
this.color_line_program = createProgram(this.gl); // (4)
attachShader(this.gl, this.color_line_program, color_line_vertex_shader); // (5)
attachShader(this.gl, this.color_line_program, fragment_shader);
linkProgram( this.gl, this.color_line_program ); // (6)
useProgram( this.gl, this.color_line_program ); // (7)
this.color_location = getUniformLocation(this.gl, // (8)
this.color_line_program, "u_color");
this.scale_location = getUniformLocation(this.gl,
this.color_line_program, "u_scale");
this.rotation_location = getUniformLocation(this.gl,
this.color_line_program, "u_rotation");
this.offset_x_location = getUniformLocation(this.gl,
this.color_line_program, "u_loop_x");
this.offset_y_location = getUniformLocation(this.gl,
this.color_line_program, "u_loop_y");
this.buffer = createBuffer(this.gl); // (9)
bindBuffer(this.gl, ARRAY_BUFFER, this.buffer);
this.position_al = getAttribLocation(this.gl, // (10)
this.color_line_program, 'position');
enableVertexAttribArray(this.gl, this.position_al);
}
If the singleton Renderer.SN(1) is not set,
I set it to this. The WebGL bindings deviate a little from the WebGL API when creating
a WebGLContext object. A function called
createContextFromCanvas(2) is passed the canvas DOM
id and the context type and returns a WebGLContext for that canvas. The code
then calls createShader(3) to create a vertex shader.
It sets the shader source calling shaderSource passing in the vertex shader code
I defined in V_COLOR_LINE_SHADER. The vertex shader is compiled by calling the
compileShader function. After creating, loading, and compiling the vertex shader,
you will need to add all of those steps for the fragment shader. After that, I create a
WebGLProgram called color_line_program using the
createProgram(4) function. After making the program,
I need to attachthe vertex and fragment shader I created earlier. I do this by calling
attachShader(5) once for each of the shaders.
The WebGLProgram is then linked by calling
linkProgram(6) and selected as the shader by calling
the useProgram(7) function. Now that our application
is using the program, I must retrieve the location of the uniform variables. I do this by
calling the getUniformLocation(8) for u_color,
u_scale, u_rotation, u_loop_x, and u_loop_y.
Next, this.buffer(9) is set to a newly created buffer,
and bindBuffer is used to bind this.buffer to the
WebGLContext as an ARRAY_BUFFER.
Finally, the position attribute location
(position_al(10)) is set by calling the
getAttribLocation and then enabled by calling enableVertexAttribArray.
clear and renderLineLoop functions
The clear and renderLineLoop functions are the online functions
in this game that draw to the canvas. The clear function clears the canvas with
a solid black color. This game engine is simple and can only render line loops. The
renderLineLoop function is the function that draws those line loops. It takes
in an array of vertices, the position to render the loop, a rotation,
scale, and color_data values. Here are those two functions:
  public clear(): void { // (1)
    clearColor(this.gl, 0.0, 0.0, 0.0, 1.0);

    clear(this.gl, COLOR_BUFFER_BIT);
  }

  public renderLineLoop(line_data: StaticArray<f32>, offset: Vector, // (2)
                        rotation: f32, scale: f32,
                        color_data: u32 = 0xff_ff_ff_ff): void {
    bufferData<f32>(this.gl, ARRAY_BUFFER, line_data, STATIC_DRAW); // (3)

    uniform1ui(this.gl, this.color_location, color_data); // (4)
    uniform1f(this.gl, this.scale_location, scale);
    uniform1f(this.gl, this.rotation_location, rotation);
    uniform1f(this.gl, this.offset_x_location, offset.x);
    uniform1f(this.gl, this.offset_y_location, offset.y);

    const dimensions:i32 = 2; // (5)
    const data_type: i32 = FLOAT;
    const normalize: i32 = false;
    const stride:i32 = 0;
    const offset:i32 = 0;

    vertexAttribPointer(this.gl, position_al, dimensions, // (6)
                        data_type, normalize, stride, offset);

    drawArrays(this.gl, LINE_LOOP, 0, line_data.length/2); // (7)
  }
}
The clear(1) function clears the canvas with the color black. It calls two functions to do this. First, it sets the clear color with the clearColor function to black. Next, it calls the WebGL clear function passing in COLOR_BUFFER_BIT. The renderLineLoop(2) function is the only rendering function in our Renderer class. Everything we will be rendering in this game is a line loop. The function calls bufferData(3) passing in the line_data as the vertices for the loop to be rendered. After buffering the data, a series of uniform variables are set in the WebGLProgram by calling uniform1ui(4) to set the color data and uniform1f to set the scale, rotation, x offset, and y offset.
I call vertexAttribPointer to tell the shaders how to read the data passed through the data buffer. I create some variables to indicate what each of the parameters are. The dimensions(5) are the number of variables we are packing into the data buffer. In our case, we are passing in an x and y value, so there are two dimensions. The data type is floating-point, so I set data_type to FLOAT. The code sets the normalize value to false. If normalize were true, the values you pass in are fixed to a certain range depending on the data_type. Stride is the distance between your group of attributes. The stride parameter passed into vertexAttribPointer(6) is frequently set to 0. That value tells WebGL not to add any number of buffer bytes between the attributes for each vertex. If you want to pad your vertex attributes, you need to set this value to the number of attribute bytes and buffer bytes. If the stride is not 0, you can add buffer bytes to the beginning or end.
The offset tells WebGL how many bytes into the stride the first attribute is located. This should always be 0 if the stride is 0. These values are then used in the call to vertexAttribPointer, which tells WebGL how the shader should read the buffer data. Finally, the drawArrays(7) function is called, passing in LINE_LOOP, because we are drawing the vertices as a line loop. The other two parameters passed into drawArrays are the starting index of the vectors you want to use. That should be 0 unless there is a vertexyou don’t want to draw at the start of the vertex array. The final parameter is the vertex count you want to render. Since each vertex has an x and y coordinate in line_data, I pass in the line_data.length / 2.
AsteroidShooter.ts
The AsteroidShooter class is a class driving the AssemblyScript portion of the game.
My goal was to write as much of the game as possible in AssemblyScript. Still, some functionality
is currently beyond the capabilities of AssemblyScript due to a lack of bindings. Playing audio,
for example, is something that AssemblyScript is not able to do directly. At the time of this
writing, the game is in a demo status. The playercan destroy all of the asteroids, and new
asteroids will respawn to replace them. The player can not be killed, and no score is kept.
The player can maneuver his space ship with the arrow keys and shoot at the asteroids by
pressing the space bar.
Imported Classes
The code in AsteroidShooter.ts begins with a series of class imports from other AssemblyScript
files. The code imports the Vector class, which is used to perform much of the
2D vector math this game uses. The Renderer class, which renders game loops to
the canvas. It also imports four game object classes, which are Asteroid,
Bullet, Explosion and PlayerShip. Here is what that
code looks like:
  import {Vector} from "./Vector";
  import {Renderer} from "./Renderer";
  import {Asteroid} from "./Asteroid";
  import {Bullet} from "./Bullet";
  import {Explosion} from "./Explosion";
  import {PlayerShip} from "./PlayerShip";
Importing Audio Functions
At the time of this writing, AssemblyScript is not able to directly play audio files. To play the laser sound when the player shoots or the explosion sound when an asteroid is destroyed, I must import functions from JavaScript that can play those sounds. The code is below:
  @external("env", "playLaser")
  export declare function playLaser(): void;

  @external("env", "playExplosion")
  export declare function playExplosion(): void;
The JavaScript for these functions are in the importObject inside the
AsteroidGame.js file. The playLaser function plays the laser sound effect,
and the playExplosion function will play the explosion sound. Next, we will
define the AsteroidShooter class.
AsteroidShooter Attributes
The attributes in the AsteroidShooter class are in four groups.
The static class variables, which include the AsteroidShooter singleton
and the time delta in milliseconds. The game objects, which include asteroids, explosions,
bullets, and the player. There are array indexes into the asteroid, explosion, and bullet arrays.
Finally, there are two variables used for a shot cool-down time. Here are those attributes:
  export class AsteroidShooter {
    // singleton
    public static SN: AsteroidShooter;  // (1) AsteroidShooter singleton

    // game objects
    public asteroidArray: Array<Asteroid> = new Array<Asteroid>(); // (2)
    public explosionArray: Array<Explosion> = new Array<Explosion>();
    public bulletArray: Array<Bullet> = new Array<Bullet>();
    public playerShip: PlayerShip = new PlayerShip();

    // array indexes
    public asteroidIndex: i32 = 0; // (3)
    public explosionIndex: i32 = 0;
    public bulletIndex: i32 = 0;

    // shot cooldown variables
    static readonly LAUNCH_WAIT: i32 = 250; // (4)
    public bulletCoolDown: i32 = 50; // (5)
The first static variable is a singleton SN(1).
There are four game object attributes. Three of them,
asteroidArray(2), explosionArray,
and bulletArray, are arrays which I will use as object pools for each of
those game object types. In games, when you see the same object repeatedly, such as a
bullet, those objects are usually created ahead of time, turned inactive when they are
not being used, and then activated again later. Creating a new bullet object every time
you pressed the space bar would quickly fill up memory. Using object pooling allows you
to make all of the objects you need ahead of time and reuse them as necessary. After the
game objects, there are index(3) variables used for spawning new
game objects from the object pools. The code increments these indexes until they are the
same size as the objectpools array, at which point they will be set back to a value of 0.
Finally, there are two variables used to manage the shot cool down for the player’s ship.
The LAUNCH_WAIT(4) is the number of milliseconds
the game waits between launching bullets. The
bulletCoolDown(5) is the amount of time remaining
before the next shot launches.
Constructor
The constructor needs to set the Singleton, create a renderer, and initialize the game objects. In the beginning, the game activates five asteroids. The game needs to make bullets and the explosions in their object pools. Here is the constructor code:
constructor() {
// set the singleton
if( AsteroidShooter.SN == null ) {
AsteroidShooter.SN = this;
}
// creating a renderer will set the singleton for the Renderer class
// this constant will exit scope at the end of the constructor, so
// I will access the Renderer using Renderer.SN
new Renderer();
// create the objects for the asteroid object pool
for( var i: i32 = 0; i < 50; i++ ) {
this.asteroidArray.push( new Asteroid() );
}
// activate five asteroids for the beginning of the game
this.activateAsteroid(0.25, -0.5, 0.5 );
this.activateAsteroid(0.25, 0.5, 0.5 );
this.activateAsteroid(0.25, -0.5, -0.5 );
this.activateAsteroid(0.25, 0.5, -0.5 );
this.activateAsteroid(0.25, 0.7, -0.2 );
// create the objects for the explosion object pool
for( i = 0; i < 30; i++ ) {
this.explosionArray.push( new Explosion() );
}
// create the objects for the bullet object pool
for( i = 0; i < 30; i++ ) {
this.bulletArray.push( new Bullet() );
}
}
The constructor starts by creating the AsteroidShooter(1)
singleton. Then I create the Renderer(2). The
Renderer is a singleton class. Later, I will access the Renderer
using Render.SN. I create 50 Asteroid objects and add them to the
asteroid pool by pushing them into asteroidArray(3).
I then activate the first five asteroids in the asteroid pool by calling
this.activateAsteroid(4) five times. After activating
the asteroids, I need to create 30 Explosion objects for the
explosionArray(5) and 30 Bullet objects for
the bulletArray(6) object pool.
Respawn Check
The respawnCheck function checks to see if any visible asteroids are remaining
in the asteroid pool. If there is an asteroid left, return from the function. If no visible
asteroids remain, activate five asteroids from the asteroid pool by calling
activateAsteroid. Here is the code for the function:
  // each frame check to see if any asteroids remain
  public respawnCheck(): void {
    // check for any asteroids that remain
    for( var i: i32 = 0; i < this.asteroidArray.length; i++ ) {
      if( this.asteroidArray[i].visible == true ) {
        // if there is a visible asteroid, return
        return; // (1)
      }
    }

    // if all of the asteroids have been destroyed, spawn five more
    this.activateAsteroid(0.25, -0.5,  0.5); // (2)
    this.activateAsteroid(0.25,  0.5,  0.5);
    this.activateAsteroid(0.25, -0.5, -0.5);
    this.activateAsteroid(0.25,  0.5, -0.5);
    this.activateAsteroid(0.25,  0.7, -0.2);
  }
The loop at the beginning checks every Asteroid object in the
asteroidArray to see if any are visible. As soon as a
visible asteroid is found, the function returns(1). If no visible asteroids are found,
the activateAsteroid(2) function is called five times to activate five
Asteroid objects if none remain.
Activate Explosion
The activateExposion function runs an explosion animation at the x, y
coordinates provided as parameters. It increments the explosionIndex, resetting
it to 0 if necessary. It then looks for the next available Explosion object from
the pool, and activates it when it finds one:
// when an asteroid is destroyed, activate an explosion from explosionArray
public activateExplosion(x: f32, y: f32 ): void {
let count: i32 = 0;
// advance the explosion index to get the next explosion in the pool
this.explosionIndex++;
// if the index is greater than the number of objects in the pool,
// reset it to 0
if( this.explosionIndex >= this.explosionArray.length ) {
this.explosionIndex = 0;
}
while( this.explosionArray[this.explosionIndex].visible == true ) {
this.explosionIndex++;
if( this.explosionIndex >= this.explosionArray.length ) {
this.explosionIndex = 0;
}
if( count++ > this.explosionArray.length ) return;
}
this.explosionArray[this.explosionIndex].activate(x, y);
}
The variable count(1) is used to check if all the
explosions are currently visible. I don’t want there to be an infinite loop, so I need to
return if I have gone all the way through the loop. The
explosionIndex(2) is incremented, and if it exceeds
the length of the explosionArray, the index is set back to 0
(3). If the Explosion object is visible, I need to
advance the explosionIndex. I do this in a
while(4) loop to continue to advance until it finds an
Explosion that is not visible. I increment the
count(5) and check to see if it is greater than the number
of objects in the pool. If all the explosions are visible, it will
return from the function. Finally, I activate(6)
the Explosion object from the pool.
Launch Bullet
The launchBullet function looks for a Bullet object in the bullet
object pool to fire from the player’s location. It shares a lot in common with the code from
activateExplosion.
  public launchBullet(): void {
    let count: i32 = 0; // (1)
    this.bulletIndex++; // (2)

    if( this.bulletIndex >= this.bulletArray.length ) {
      this.bulletIndex = 0; // (3)
    }

    while( this.bulletArray[this.bulletIndex].visible == true ) { // (4)
      this.bulletIndex++;

      if( this.bulletIndex >= this.bulletArray.length ) {
        this.bulletIndex = 0;
      }

      if( count++ > this.bulletArray.length ) return;
    }

    this.bulletArray[this.bulletIndex].launch( // (5)
          AsteroidShooter.SN.playerShip.rotation,
          AsteroidShooter.SN.playerShip.position );
  }
The code sets the count(1) variable to 0.
It counts the number of visible checks performed. The
bulletIndex(2) is incremented, and reset to
0(3) if its value exceeds the bulletArray length.
There is a while(4) loop that advances the
bulletIndex if the Bullet is visible. Once we
find a Bullet object that is not visible, call the
launch(5) function on the selected Bullet.
Activate Asteroid
The last function in the Asteroid class is activateAsteroid.
When an asteroid is destroyed, I need to activate two more asteroids, unless the asteroids
are of the smallest size. When the player has destroyed all of the asteroids, new ones are
activated to replace them. The code in the activateAsteroid functionis very
similar to the activateExplosion code.
  public activateAsteroid(size: f32, x: f32, y: f32 ): void {
    let count: i32 = 0; // (1)
    this.asteroidIndex++; // (2)

    if( this.asteroidIndex >= this.asteroidArray.length ) {
      this.asteroidIndex = 0; // (3)
    }

    while( this.asteroidArray[this.asteroidIndex].visible == true ) { // (4)
      this.asteroidIndex++;

      if( this.asteroidIndex >= this.asteroidArray.length ) {
        this.asteroidIndex = 0;
      }

      if( count++ > this.asteroidArray.length ) return;
    }

    this.asteroidArray[this.asteroidIndex].activate(size, x, y); // (5)
  }
Like the activateExplosion function, the activateAsteroid
function begins with a local count(1)
variable set to 0. I increment the asteroidIndex(2).
If it is greater than or equal to the length of the asteroidArray,
reset the value to 0(3). Like in
activateExplosion, there is a while(4)
loop that advances the asteroidIndex until it finds an Asteroid
object that is not visible. When it finds an asteroid to use, it calls the
activate(5) function on that pool object.
Creating an AsteroidShooter object
The AsteroidShooter class has a singleton called SN.
Instantiate an AsteroidShooter to set the Asteroid.SN singleton.
Immediately after the end of the AsteroidShooter class, I create a new
AsteroidShooter object.
new AsteroidShooter();
Next I will create the LoopCallback function
LoopCallback
The app calls the LoopCallback function every time the browser renders a frame.
It acts as a game loop, driving the logic of the game. It calls functions to move and render
the game objects and checks the status of the keyboard. The playerShip object
moves based on the pressed keys.
  export function LoopCallback(delta_ms: i32,
    leftKeyPress: bool, rightKeyPress: bool,
    upKeyPress: bool, downKeyPress: bool,
    spaceKeyPress: bool): void {
    // subtract the time delta from the bulletCoolDown
    AsteroidShooter.SN.bulletCoolDown -= delta_ms; // (1)

    // clear the canvas
    Renderer.SN.clear(); // (2)

    // set DELTA to a fraction of a second
    Renderer.DELTA = <f32>delta_ms / 1000.0;

    // move and draw all the asteroids
    for (var i: i32 = 0; i < AsteroidShooter.SN.asteroidArray.length; i++) { // (3)
      AsteroidShooter.SN.asteroidArray[i].move();
      AsteroidShooter.SN.asteroidArray[i].draw();
    }

    // move the playerShip if a key is pressed
    if (leftKeyPress) { // (4)
      AsteroidShooter.SN.playerShip.turnLeft();
    }

    if (rightKeyPress) {
      AsteroidShooter.SN.playerShip.turnRight();
    }

    if (upKeyPress) {
      AsteroidShooter.SN.playerShip.accelerate();
    }

    if (spaceKeyPress && AsteroidShooter.SN.bulletCoolDown <= 0) { // (5)
      AsteroidShooter.SN.bulletCoolDown = AsteroidShooter.LAUNCH_WAIT;
      AsteroidShooter.SN.launchBullet();
      playLaser();
    }

    // move and draw the bullets. Then run a hit test against the asteroids
    for (i = 0; i < AsteroidShooter.SN.bulletArray.length; i++) { // (6)

      if (AsteroidShooter.SN.bulletArray[i].visible == true) {
        AsteroidShooter.SN.bulletArray[i].move();
        AsteroidShooter.SN.bulletArray[i].draw();

        // hit test visible bullets against visible asteroids
        for (var j: i32 = 0; j < AsteroidShooter.SN.asteroidArray.length; j++) { // (7)
          if (AsteroidShooter.SN.asteroidArray[j].visible == true &&
            AsteroidShooter.SN.bulletArray[i].hitTest(
                                  AsteroidShooter.SN.asteroidArray[j])) {
            // if a bullet collides with an asteroid create an explosion
            AsteroidShooter.SN.activateExplosion(
              AsteroidShooter.SN.asteroidArray[j].position.x,
              AsteroidShooter.SN.asteroidArray[j].position.y);
            playExplosion();
            if (AsteroidShooter.SN.asteroidArray[j].scale >= 0.05) {
              const half_scale = AsteroidShooter.SN.asteroidArray[j].scale / 2;
              const asteroid_x = AsteroidShooter.SN.asteroidArray[j].position.x;
              const asteroid_y = AsteroidShooter.SN.asteroidArray[j].position.y;

              AsteroidShooter.SN.activateAsteroid(half_scale,
                asteroid_x + half_scale,
                asteroid_y - half_scale);

              AsteroidShooter.SN.activateAsteroid(half_scale,
                asteroid_x - half_scale,
                asteroid_y + half_scale);
            }

            AsteroidShooter.SN.bulletArray[i].visible = false;
            AsteroidShooter.SN.asteroidArray[j].visible = false;
            break;

          }
        }
      }
    }

    // move and draw the explosions
    for (i = 0; i < AsteroidShooter.SN.explosionArray.length; i++) { // (8)
      AsteroidShooter.SN.explosionArray[i].move();
      AsteroidShooter.SN.explosionArray[i].draw();
    }

    // move and draw the player ship
    AsteroidShooter.SN.playerShip.move(); // (9)
    AsteroidShooter.SN.playerShip.draw();

    AsteroidShooter.SN.respawnCheck(); // (10)
  }
The JavaScript calls the LoopCallback function every frame rendered. The
delta_ms parameter contains the number of milliseconds since the previous render.
There are also parameter flags for every game key pressed. The first thing the
LoopCallback does is reduce the bulletCooldown(1)
by delta_ms. I then call Renderer.SN.clear(2) to
clear the canvas. I set Renderer.DELTA to the fraction of a second since the previous
render by dividing delta_ms by 1000. I loop over each of the asteroids in
the asteroidArray(3) and call move and draw on every
Asteroid object. I check to see if the
leftKeyPress(4) or rightKeyPress flag is set to
true and turn the playerShip right or left if either is. I check the
upKeyPress and accelerate the playerShip if that key is pressed. If
the spaceKeyPress(5) is true, and the
bulletCoolDown is less than or equal to 0, I reset the bulletCoolDown
value and I call the launchBullet and playLaser functions. Those calls
launch a new Bullet object from the object pool and play the laser sound. I then
loop through every bullet in the bulletArray(6), calling
move and draw on each one. Inside the loop over the bulletArray, I loop through
the asteroidArray(7) checking for a collision between each
bullet and each asteroid. If the hitTest returns true, I call
activateExplosion and playExplosion to create an explosion animation and
play the explosion sound. If the asteroid’s scale is greater than 0.05, I create two
asteroids that are half the size. I set the bullet and asteroid’s visible attribute
set to false. This prevents them from being rendered, and makes them available in the
object pool. There is a loop that calls move and draw on each of the explosions in the
explosionArray(8). The
playerShip(9) is moved and drawn, and the
respawnCheck(10) is run.
https://github.com/battlelinegames/AssemblyScriptAsteroids/blob/master/src/AsteroidShooter.asc
PlayerShip.ts
The PlayerShip class has functions to move and render the player’s space ship.
Rendering the player ship requires code that draws four different loops for different
parts of the ship. Some trigonometry is required to accelerate the player ship in the correct
direction. The player ship caps its movement to a maximum velocity. The first few lines of
the PlayerShip.asc file import the Vector and Renderer classes:
  import {Vector} from './Vector';
  import {Renderer} from './Renderer';
The Vector class does all of the 2D vector math for the player ship.
The Renderer renders the four loops of the player ship. At the beginning
of the PlayerShip class, I define the class attributes:
export class PlayerShip {
// readonly static properties of PlayerShip
static readonly TWO_PI: f32 = 6.2831853;
static readonly ACCELERATION: f32 = 0.3;
static readonly ROTATE_VEL: f32 = 2.0;
static readonly MAX_VEL_SQ: f32 = 0.25;
static readonly MAX_VEL: f32 = 0.5; // movement, position, scale and rotation
public velocity: Vector = new Vector();
public delta_velocity: Vector = new Vector();
public position: Vector = new Vector(); // scale and rotation
public scale: f32 = 0.1;
public rotation: f32 = 3.14159; // position loop data
public shipBody:StaticArray<f32> = [-0.1,-0.7,
0.1,-0.7,
0.5,0.1,
0.5,0.5,
0,0.4,
-0.5,0.5,
-0.5,0.1,];
public shipCockpit:StaticArray<f32> = [0,-0.6,
-0.2,0,
0,-0.1,
0.2,0,];
public leftGun:StaticArray<f32> = [-0.4,-0.1,
-0.4,-0.5,
-0.3,-0.5,
-0.3,-0.3,];
public rightGun:StaticArray<f32> = [ 0.3,-0.3,
0.3,-0.5,
0.4,-0.5,
0.4,-0.1,];
The attributes start with a group of static readonly variables that define
constants used by PlayerShip. These variables include
TWO_PI(1), which is two times the value π.
ACCELERATION, is the scalar acceleration value. ROTATE_VEL which is
the rotation velocity. MAX_VEL, is the maximum scalar velocity of the space ship.
And finally, MAX_VEL_SQ which squares the maximum scalar velocity. After the
readonly values, there are four Vector(2) variables.
These vectors are all used for moving and positioning the player ship on the canvas. The
velocity vector is the player ship's x-axis and y-axis speed. The delta_velocity
is the velocity adjusted by DELTA for changing frame rates. The player's coordinates
are in the position vector. The
scale(3) and rotation values follow the
Vector variables. The scale is the resize value multiplied against
each vertex to display the loop to the screen. It is also used when moving the ship to wrap
it from top to bottom and left to right when the player ship exits the canvas on one side and
must reappear on the other. The PlayerShip class uses rotation for
rotating the vertices and acceleration. Next is a series of
StaticArray(4) variables that contain point data for each
loop to render. The series of arrays include the shipBody, shipCockpit,
leftGun and rightGun. The draw function will render each
of these to the canvas. These arrays alternate x and y coordinates. In the code, I put an x,
y coordinate pair on each line.
move
There are five functions in the code. They are move, draw,
accelerate, turnLeft, and turnRight. The move
function is defined as follows:
  public move(): void {
    // cap the velocity to MAX_VEL
    if( this.velocity.magSq() > PlayerShip.MAX_VEL_SQ ) {
      this.velocity.normalize(PlayerShip.MAX_VEL);  // (1)
    }

    // move the position by the delta_velocity
    this.delta_velocity.copy( this.velocity );  // (2)
    this.delta_velocity.multiply( Renderer.DELTA );
    this.position.add( this.delta_velocity );

    // if position moves off the canvas to left or right move to opposite side
    if( this.position.x < -1 - this.scale/2 ) { // (3)
      this.position.x = 1 + this.scale / 3;
    }
    else if( this.position.x > 1 + this.scale/2 ) {
      this.position.x = -1 - this.scale / 3;
    }

    // if position moves off the canvas top or bottom move to opposite side
    if( this.position.y < -1 - this.scale/2 ) { // (4)
      this.position.y = 1 + this.scale / 3;
    }
    else if( this.position.y > 1 + this.scale/2 ) {
      this.position.y = -1 - this.scale / 3;
    }
  }
If the squared magnitude of the velocity is greater than MAX_VEL_SQ,
normalize the velocity vector to MAX_VEL(1). I use the
squared value of the magnitude to avoid making a square root call. The velocity
vector is then adjusted by DELTA to set
delta_velocity(2). The position vector
adds delta_velocity to move the player ship. After that, an
if(3)/else block that checks if the position
has moved off the canvas. If it has, it is moved to the opposite side.
draw
The draw function calls the renderLineLoop on the
Renderer class four times to render the four loops defined as
StaticArray variables earlier. Here is what that code looks like:
  public draw(): void {
    Renderer.SN.renderLineLoop(this.shipBody, this.position,
                                this.rotation, this.scale, 0x00_ff_00_ff );
    Renderer.SN.renderLineLoop(this.shipCockpit, this.position,
                                this.rotation, this.scale, 0x00_ff_ff_ff );
    Renderer.SN.renderLineLoop(this.leftGun, this.position,
                                this.rotation, this.scale, 0xa1_00_00_ff );
    Renderer.SN.renderLineLoop(this.rightGun, this.position,
                                this.rotation, this.scale, 0xa1_00_00_ff );
  }
The draw function renders four loops with different colors. The function
renders shipBody green (0x00_ff_00_ff), shipCockpit
teal (0x00_ff_ff_ff), leftGun and rightGun dark red
(0xa1_00_00_ff). The color value passed as the last parameter has a hex color
value for red, green, blue,and alpha channels.
Accelerate
The accelerate function uses a little trigonometry to add the acceleration to
the velocity vector. Here is the code that does this:
  public accelerate(): void {
    this.velocity.y += Mathf.sin(this.rotation) *
                      (PlayerShip.ACCELERATION * Renderer.DELTA);
    this.velocity.x += Mathf.cos(this.rotation) *
                      (PlayerShip.ACCELERATION * Renderer.DELTA);}
The accelerate function uses the angle's sine to accelerate the
velocity along the y-axis and the angle's cosine for the velocity
x-axis.
Turning the Player Ship
Two functions turn the PlayerShip object left and right.
  public turnRight(): void {
    this.rotation -= PlayerShip.ROTATE_VEL * Renderer.DELTA;
    if( this.rotation < 0.0 ) {
      this.rotation += PlayerShip.TWO_PI;
    }
  }

  public turnLeft(): void {
    this.rotation += PlayerShip.ROTATE_VEL * Renderer.DELTA;
    if( this.rotation >= PlayerShip.TWO_PI ) {
      this.rotation -= PlayerShip.TWO_PI;
    }
  }
The turnRight function turns the player ship to the right by subtracting the
rotation velocity from the ship’s rotation. The turnLeft function turns the
player ship to the left by adding the rotation velocity to the ship’s rotation.
https://github.com/battlelinegames/AssemblyScriptAsteroids/blob/master/src/PlayerShip.asc
Bullet.ts
  import {Vector} from './Vector';
  import {Renderer} from './Renderer';
  import {Asteroid} from './Asteroid';
  import {PlayerShip} from './PlayerShip';

  export class Bullet {
    public lineLoop: StaticArray<f32> = [-0.01, 0.01, // (1)
                                          0.0,0.04,
                                          0.01,0.01,
                                          0.04,0.0,
                                          0.01,-0.01,
                                          0.0,-0.04,
                                          -0.01,-0.01,
                                          -0.04,0.0,];

    // scale and rotation values
    public scale: f32 = 0.5;  // (2)
    public scaledRadius: f32 = 0.1;
    public rotation: f32 = 0.0;

    // vector variables
    public velocity: Vector = new Vector();  // (3)
    public delta_velocity: Vector = new Vector();
    public position: Vector = new Vector();
    public visible: bool = false; // (4)
The first four lines import the Vector, Renderer,
Asteroid, and PlayerShip classes. Inside the Bullet
class, there are several groups of attributes. The first is a
StaticArray lineLoop(1). This lineLoop
contains all the vertex data used to define the bullet object. The next three values are
scale(2), scaleRadius, and
rotation. The scale variable is passed to the Renderer,
scaling the lineLoop data. The scaledRadius is the size used for
collision detection. The rotation attribute will be changed every frame to cause
the bullet to spin when rendered. After the rotation and scaling,
there are three Vector attributes. These attributes move and position the object.
The velocity(3) Vector holds the distance
and direction the bullet will move in a second. The delta_velocity is the
velocity adjusted by the time delta. Finally, the position holds the x and y
coordinates of the Bullet object. The
visible(4) attribute tells the game where the bullet
should be rendered and used for collision detection.
move
The move function moves the bullet based on the velocity, rotates
the bullet, and checks to see if it has exited the canvas. Here is the code for that function
  public move(): void {
    // only move if this is visible
    if( this.visible == true ) { // (1)
      // adjust the position based on the position and the time delta
      this.delta_velocity.copy( this.velocity ); // (2)
      this.delta_velocity.multiply( Renderer.DELTA );
      this.position.add(this.delta_velocity); // (3)

      // rotate this bullet every frame
      this.rotation += 0.75; // (4)
      if( this.rotation > 6.283 ) {
        this.rotation -= 6.283;
      }

      // check to see if the bullet has moved off screen
      if( this.position.x < -1 - this.scale || // (5)
            this.position.x > 1 + this.scale ||
            this.position.y < -1 - this.scale ||
            this.position.y > 1 + this.scale ) {

        this.visible = false; // (6)
      }
    }
  }
If the visible(1) attribute is true, I move the object. If it is
false, this function exits. The delta_velocity(2) is then set from the
velocity vector, multiplying it by the Render.DELTA. The
delta_velocity is added to the position(3) vector to move the
Bullet object. The rotation(4) is increased by 0.75,
and if its value is greater than two π, the value is reduced by two π. After that, there is
an if(5) block that checks to see if the bullet has moved off the canvas. If so,
visible(6) is set to false, which will prevent it from being rendered
or moved in the future.
draw
The draw function checks if the bullet is visible, and if so,
calls renderLineLoop to render this bullet:
  public draw(): void {
    if( this.visible == true ) {
      Renderer.SN.renderLineLoop(this.lineLoop, this.position,
      this.rotation, this.scale, 0xff_ff_00_ff );
    }
  }
launch
The launch function sets the bullet’s position to the ship_position
and sets the visible attribute to true. It also sets the
velocity x and y values based on the angle of the player ship. Here is that code:
hitTest
The final function in the Bullet class is hitTest. The
hitTest function uses the Pythagorean Theorem to determine if there is a
collision between the bullet and an asteroid. If the distance between the two objects
is less than the sum of the radii, the hitTest returns true;
otherwise, it returns false:
  public hitTest( asteroid: Asteroid ): bool {
    let rad_sum_sq: f32 = asteroid.scaledRadius + this.scaledRadius; // (1)
    rad_sum_sq *= rad_sum_sq; // (2)
    let x_dist: f32 = this.position.x - asteroid.position.x; // (3)
    let y_dist: f32 = this.position.y - asteroid.position.y; // (4)
    let dist_sq: f32 = x_dist * x_dist + y_dist * y_dist; // (5)

    if( dist_sq < rad_sum_sq ) { // (6)
      return true;
    }

    return false;
  }
The rad_sum_sq(1) variable is the sum of the
scaledRadius of the asteroid and this bullet. The
rad_sum_sq(2) variable then needs to be squared
and compared to the squared distance between the two objects. I use the Pythagorean Theorem
(A2 + B2 = C2). However, I don’t take the square root because
it is faster to square a number than take its square root. The
x_dist(3) variable is the distance between the bullet
and the asteroid on the x-axis, y_dist(4) the y-axis.
The dist_sq(5) variable is the squared distance
(C2 in the Pythagorean Theorem). I don’t need to find C because we squared the
sum of the object sizes. I check to see if the dist_sq(6)
is less than the rad_sum_sq. If it is, that indicates a collision, and I
return true. Otherwise, return false.
https://github.com/battlelinegames/AssemblyScriptAsteroids/blob/master/src/Bullet.asc
Explosion.ts
The Explosion.asc file contains the Explosion class, a simple explosion
animation that runs when a bullet destroys an asteroid. The function imports the
Vector and Renderer class before defining the
Explosion class:
import {Vector} from './Vector';
import {Renderer} from './Renderer';
The Explosion class begins with a series of attributes that set the
animation time and frame number for the explosion and the loops to render. Here is the
beginning of the Explosion class:
export class Explosion {
  static readonly FRAME_TIME: f32 = 0.04;
  public frameTimeRemaining: f32 = 0.04;

  // these four loops will be used in the animation
  public exp1Loop: StaticArray<f32> = [0,0.2,
                                        -0.1,0,
                                        0,-0.2,
                                        0.1,0,];
  public exp2Loop: StaticArray<f32> = [0,0.3,
                                      -0.1,0.1,
                                      -0.3,0,
                                      -0.1,-0.1,
                                      0,-0.3,
                                      0.1,-0.1,
                                      0.3,0,
                                      0.1,0.1,];

  public exp3Loop: StaticArray<f32> = [0.3,0.3,
                                      0,0.2,
                                      -0.3,0.3,
                                      -0.2,0,
                                      -0.3,-0.3,
                                      0,-0.2,
                                      0.3,-0.3,
                                      0.2,0,];

  public exp4Loop: StaticArray<f32> = [0.6,0.6,
                                      0.1,0.3,
                                      0,0.8,
                                      -0.1,0.3,
                                      -0.6,0.6,
                                      -0.3,0.1,
                                      -0.8,0,
                                      -0.3,-0.1,
                                      -0.6,-0.6,
                                      -0.1,-0.3,
                                      0,-0.8,
                                      0.1,-0.3,
                                      0.6,-0.6,
                                      0.3,-0.1,
                                      0.8,0,
                                      0.3,0.1,];

  public position: Vector = new Vector(0.0, 0.0);
  public rotation: f32 = 0.0;
  public scale: f32 = 0.2;
  public visible: bool = false;
  public currentFrame: i32 = 0;
The attributes begin with the FRAME_TIME and frameTimeRemaining.
The FRAME_TIME is a readonly variable that is the time between changing the loops
that it renders. The frameTimeRemaining is the time left until the class renders
the next set of loops. After that, there are four loops rendered sequentially. There is a
position vector, as well as a rotation and scale
variable. The visible variable moves the object to and from the explosion object pool.
Finally, the currentFrame tells the object which loops to render.
move
The move function checks to see if the explosion is visible and exits if it is
not. The function advances the current frame, rotates, and scales the animation. If the animation
is complete, it sets the visible flag back to false, making this explosion available
in the explosion pool. Here is the move code:
  public move(): void {
    if( this.visible == true ) {
      this.frameTimeRemaining -= Renderer.DELTA;

      if( this.frameTimeRemaining < 0 ) {
        this.frameTimeRemaining = Explosion.FRAME_TIME;
        this.currentFrame++;

        if( this.currentFrame >= 4 ) {
          this.visible = false;
        }
      }
      this.rotation += 0.2;
      this.scale += 0.02;
    }
  }
The first line checks to see if the explosion if visible. If it is not visible,
there is no need to move the explosion. The frameTimeRemaining is reduced by the
DELTA time. If the frameTimeRemaining is less than 0, I need to reset
frameTimeRemaining to FRAME_TIME and increment the
currentFrame. If currentFrame is >= 4,
the visible flag is set to false, making this object available in
the explosion object pool. The rotation and the scale is incremented
for the animation.
draw
The draw function checks to see if this object is visible, and if it is visible,
it will render one or more line loops based on the value of currentFrame. Here is
the code:
  public draw(): void {
    if( this.visible == true ) {
      if( this.currentFrame == 0 ) {
        Renderer.SN.renderLineLoop(this.exp1Loop, this.position,
                                  this.rotation, this.scale, 0xff_00_00_ff );
      }
      else if( this.currentFrame == 1 ) {
        Renderer.SN.renderLineLoop(this.exp2Loop, this.position,
                                  this.rotation, this.scale, 0xff_00_00_ff );
      }
      else if( this.currentFrame == 2 ) {
        Renderer.SN.renderLineLoop(this.exp1Loop, this.position,
                                    this.rotation, this.scale, 0xff_ff_00_ff );

        Renderer.SN.renderLineLoop(this.exp3Loop, this.position,
                                    this.rotation, this.scale, 0xff_00_00_ff );
        }
        else if( this.currentFrame == 3 ) {
          Renderer.SN.renderLineLoop(this.exp2Loop, this.position,
                                      this.rotation, this.scale, 0xff_ff_00_ff );
          Renderer.SN.renderLineLoop(this.exp4Loop, this.position,
                                    this.rotation, this.scale, 0xff_00_00_ff );
        }
      }
    }
The draw function first checks to see if the explosion is
visible and only renders if it is. It branches on the currentFrame
value and renders the appropriate line loop based on the frame number. If the
currentFrame is 2 or 3, the function renders more than one loop.
activate
The activate function is the final function in the Explosion
class. It sets the position, scale, currentFrame,
and frameTime. It also sets the visible flag to true,
which takes the explosion out of the pool and causes the explosion to move and
draw until the animation is complete. Here is the code:
  public activate( x:f32, y:f32 ): void {
    this.position.x = x; // (1)
    this.position.y = y;
    this.scale = 0.2; // (2)
    this.visible = true; // (3)
    this.currentFrame = 0; // (4)
    this.frameTimeRemaining = Explosion.FRAME_TIME; // (5)
  }
The activate function starts by setting the position.x(1)
and position.y values to the x and y coordinates passed to the function.
The scale(2) is reset to 0.2, which will grow throughout the
animation. The visible(3) flag will be set to true, which will
make the explosion unavailable to activate in the future until the animation is complete.
The currentFrame(4) is reset to 0, which renders the first frame. Finally,
the frameTimeRemaining(5) is set to the FRAME_TIME, which is
the time to wait until the currentFrame increments.
https://github.com/battlelinegames/AssemblyScriptAsteroids/blob/master/src/Explosion.asc
The Art of WebAssembly
Author and expert Rick Battagline eases the reader through Wasm's complexities using
clear explanations, illustrations, & plenty of examples.
Learn More

Hands-On Game Dev with Wasm
Author and expert Rick Battagline teaches 2D game development fundamentals in C++
using the Emscripten WebAssembly toolchain.
Learn More

ClassicSolitaire.com
Are you bored right now? Play Classic Solitaire and be slightly less bored. Also, it's how
I earn a living, so it would really help me out if you wasted time on my site. :-)
Play Solitaire