


Vector Engine and AssemblyScript
April 28, 2021
NOTE: I skip over a lot of AssemblyScript basics in this tutorial. If you need help, please contact me on twitter (@battagline) or the AssemblyScript Discord (http://discord.gg/assemblyscript) (#gamedev channel)
Game development can seem a bit daunting for many people. Where exactly do you get started? I could say the same about WebAssembly development. You may wonder how to start writing a game that targets WebAssembly. AssemblyScript is the fastest and easiest way to get started writing WebAssembly applications. I've developed Vector Engine to make it quick and easy to write simple arcade-style games for the web using AssemblyScript. This engine makes it easy to create simple old-school vector graphics games, even if you have limited artistic or audio skills. In this tutorial, I'll walk you through how to start with a simple "hello world" application using AssemblyScript and VectorEngine.
Installing what you need
To use AssemblyScript, you need to have Node.js. If you have developed applications for the web, there is a good chance you already have Node.js installed. If not, it is a quick and easy process that is thoroughly documented, so I'm not going to go into that process in this tutorial. If you do not have AssemblyScript installed; you can do so with the Node Package Manager (npm) using the following command:
npm i assemblyscript -g
AssemblyScript uses the asc command to compile code. Once we have something to run, we will be
using asc to compile our AssemblyScript into WebAssembly. AssemblyScript has a design that is very similar to TypeScript. AssemblyScript doesn't support 100% of the TypeScript syntax, but it is a very similar language. If you've used TypeScript in the past, you'll feel right at home using AssemblyScript.
Once you've installed AssemblyScript, you'll need to use npm to install VectorEngine using the following command:
npm i vectorengine
Now that you have VectorEngine installed, you should be ready to start coding.
index.html
To run a WebAssembly app, you need an HTML web page to load and execute the WebAssembly. You don't need VectorEngine to do this, but I've tried to make the process as simple as possible. Create a file called index.html and add the following code to it:
  <html>

  <head>
    <style>
      body {
        background-color: #3b3b3b;
        text-align: center;
      }
    </style>

  </head>

  <body>
    <canvas width="640" height="640" id="cnvs"></canvas>
    <script type="module">
      import { runVectorGame } from "https://unpkg.com/vectorengine@1.0.28/lib/VectorEngine.js";

      runVectorGame("cnvs", "helloworld.wasm", "gameLoop");
    </script>
  </body>

  </html>
This HTML file is pretty simple. There is a canvas tag with an id of
cnvs. This is where the VectorEngine will render the game's graphics.
The module imports a single function runVectorGame from VectorEngine.min.js.
This file pulls it off of the unpkg.com website. You can download this file and references
it from your own webserver, or you can copy it out of the node_modules/vectorengine/lib
directory. The runVectorGame function takes in the canvas id, the WebAssembly
file name, and the name of your game loop funciton.
You will not be able to open this file on your desktop to run the app. WebAssembly requires a webserver to serve the .wasm binary. Because of this, we will need to run one to serve this file. I will write about that later in this tutorial.
The AssemblyScript
Now we can write some AssemblyScript code. Create a file called helloworld.ts.
Right now, AssemblyScript uses the .ts extension, which typically indicates a
TypeScript file. AssemblyScript is close enough to TypeScript that this works
most of the time for code completion and syntax highlighting. Once you've created
helloworld.ts, add the following line of code to import the DisplayString
class and the renderLoop function from vectorengine:
import { DisplayString, renderLoop } from 'vectorengine';
The DisplayString class allows you to render vectorized text to the canvas.
You can call the renderLoop function to render a vector loop to the canvas.
Saying hello
I will create an object called helloWorld, which I can use to render a string of text to the canvas. I can pass a string I want to display using the new operator, followed by the x and y coordinates where I want it to render on the canvas, a scale, and a color. The WebGL coordinate system makes the far left side of the canvas x=-1.0 and the far right of the canvas x=1.0. The top of the canvas is y=1.0, and the bottom of the canvas is y=-1.0.
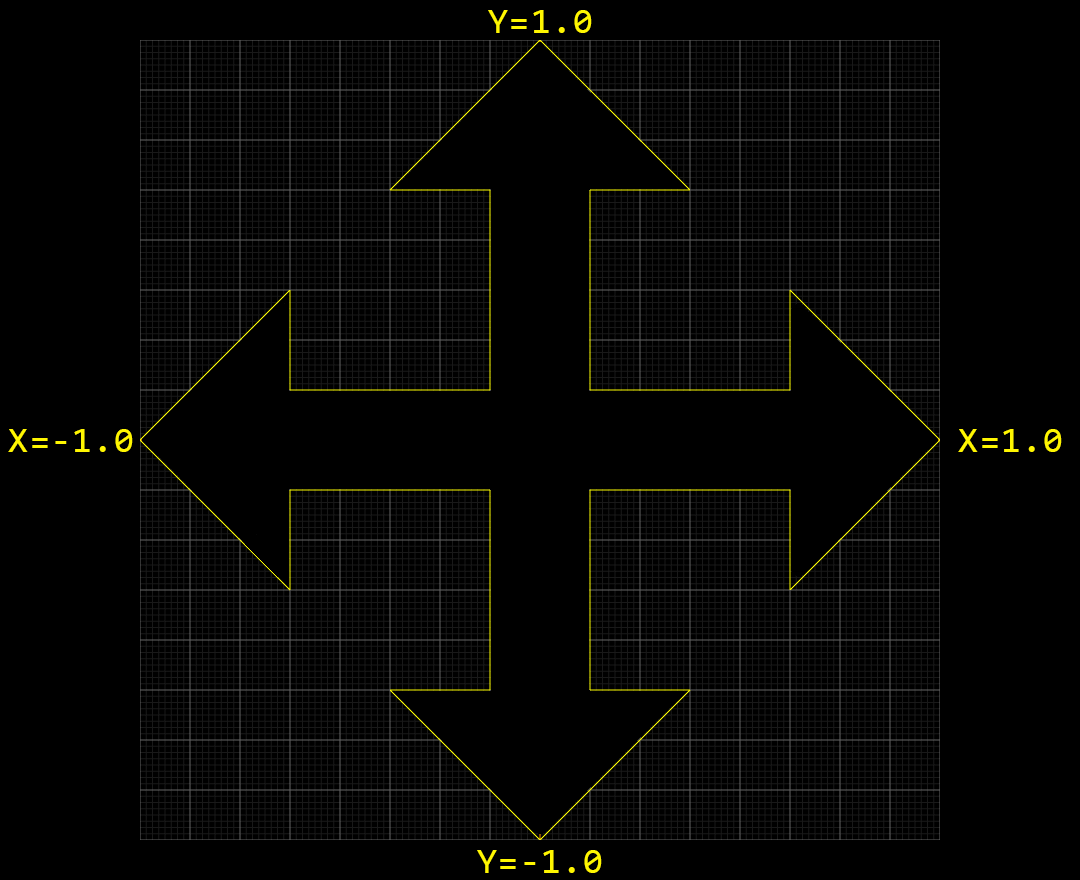
In the code that follows, I set the x value to 0.0, which puts the text in the screen center. I set the y value to 0.3. That is 30% the distance from the center of the screen and the top.
  let x: f32 = 0.0; // f32 => 32-bit floating point number
  let y: f32 = 0.3;
  let scale: f32 = 0.04;
  let yellow: u32 = 0xff_ff_00_ff; // u32 => 32-bit unsigned integer
  const helloWorld = new DisplayString("Hello Vector Engine", x, y, scale, yellow);
When I create the helloWorld DisplayString object, I need to pass x and y
coordinates to the constructor. The scale value needs to be passed to the constructor to
reduce the size of the characters. At full size, each character would take up most of the canvas.
The final constructor parameter is the text color. It is a 32-bit color in RGBA (red, green, blue, alpha)
display format. This color will be yellow (red=255, green=255, blue=0, alpha=255).
Heart loop
I will be displaying a heart vector in addition to the hello text I created above. The heart vector is a simple line loop. You can create these loops in any number of ways. If you want, you can even make one on graph paper. I generated the data using my lines tool. Here's a screen shot:

The renderLoop function takes a static array with a list of x and y coordinates alternating between x and y. These are WebGL coordinates, so the values range between -1.0 and 1.0. Here is what that code looks like:
  const heartLoop: StaticArray<f32> = [
    // x, y
    0, 0.4375, // first point
    0.125, 0.625, // second point
    0.2578125, 0.7421875, // third point...
    0.375, 0.796875,
    0.5, 0.796875,
    0.625, 0.75,
    0.7578125, 0.6171875,
    0.875, 0.375,
    0.875, 0.125,
    0.75, -0.125,
    0, -0.875,
    -0.75, -0.125,
    -0.875, 0.125,
    -0.875, 0.375,
    -0.7421875, 0.6171875,
    -0.625, 0.75,
    -0.5, 0.796875,
    -0.375, 0.796875,
    -0.25, 0.75,
    -0.125, 0.625,];
The Game Loop
When you have code in the main body of the AssemblyScript file you are compiling, that code
executes when the module is loaded. I designed VectorEngine to create games, and most games
have a game loop. A game loop usually executes in an infinite loop, running game code and
rendering graphics on every pass through the loop. WebAssembly games work slightly differently.
The web browser refreshes and renders the graphics for a web page. If your WebAssembly code
executed an infinite loop, it would never relinquish control back to the browser, and the browser
tab would hang. Instead, when you runVectorGame("cnvs", "helloworld.wasm", "gameLoop");
from the index.html page, it registered a function called gameLoop that is called
every time a frame is rendered by the browser. You can call this function anything you want, as
long as the name in your WebAssembly code matches the name you pass to runVectorGame.
Here is the code in our gameLoop function:
  export function gameLoop(delta: i32): void {
    helloWorld.render();

    const scale: f32 = 0.3;
    const x: f32 = 0.0;
    const y: f32 = -0.2;
    const rotation: f32 = 0.0;
    const red: u32 = 0xff_00_00_ff;
    renderLoop(heartLoop, x, y, red, rotation, scale);
  }
The game loop receives a delta parameter, an integer value that contains the number of milliseconds that have passed since the previous frame render. It is handy to have this value to keep animations running at a consistent rate, regardless of the frame rate. If you don't consider the delta, faster computers will render animations more quickly than slower computers.
The first thing the game loop does is render the helloWorld text by calling
helloWorld.render(). VectorEngine does not currently maintain a scene graph
(I'll explain scene graphs some other time). The game loop must render everything you want
to appear on the canvas. After rendering the helloWorld object, I call
renderLoop to render the heart on the screen.
Now that you have something that can render we can compile our helloworld.ts file into a helloworld.wasm file with the following command:
asc helloworld.ts --importMemory -o helloworld.wasm
--importMemory flag to
the asc compiler. The JavaScript portion of VectorEngine needs to set values in
linear memory by the AssemblyScript portion of the code. If you don't
know what linear memory is, I will go into that in a later chapter.
There's one last thing you need to do before opening the app in a web browser. WebAssembly requires that a web server serve the .wasm file. Because of this, you will need to create a simple static webserver to serve up the index.html file. If you open your HTML file directly from the file system, it won't work. I don't want to make this a tutorial about writing a web server. There are plenty of tutorials around Node.js web servers online. But here is the code for a simple Node.js webserver:
  import connect from 'connect';
  import serveStatic from 'serve-static';
  connect().use(serveStatic("./")).listen(8080, function () {
    console.log('Server running on 8080...');
  });
connect and serve-static
npm packages for the server above to work.
Once you open your index.html file in a web browsers, it should look like this:

Animating the Heart
It's nice to have something displaying on the canvas, but it would be nicer to have it animated. I'm going to add an animation to this page by adding two lines of code and modifying one more. The new code will use a sine wave to modify the scale of the heart loop. Here is what the new code looks like:
  let timeChange: f32 = 0.0; // ADD THIS LINE

  export function gameLoop(delta: i32): void {

    timeChange += <f32>delta / 1000.0; // ADD THIS LINE

    helloWorld.render();

    const scale: f32 = (Mathf.sin(timeChange * 18) + 1.05) / 50.0 + 0.2; // CHANGE LINE
The code adds a new global variable timeChange. This variable will change
over time based on the delta value passed into the function. The code that does that is
the second line we add, where I convert the parameter integer delta into a
floating-point value that is a fraction of a second. Finally, the scale
constant changed from a fixed value to a value based on a modified sine wave. The formula
I used isn't anything fancy. I came up with it through trial and error until I had something
that looked right. Check out the final version of the application and
the final version of the code
(application | code)
The Art of WebAssembly
Author and expert Rick Battagline eases the reader through Wasm's complexities using
clear explanations, illustrations, & plenty of examples.
Learn More

Hands-On Game Dev with Wasm
Author and expert Rick Battagline teaches 2D game development fundamentals in C++
using the Emscripten WebAssembly toolchain.
Learn More

ClassicSolitaire.com
Are you bored right now? Play Classic Solitaire and be slightly less bored. Also, it's how
I earn a living, so it would really help me out if you wasted time on my site. :-)
Play Solitaire