AssemblyScript vector button
May 16, 2021
NOTE: I skip over a lot of AssemblyScript basics in this tutorial. If you need help, please contact me on twitter (@battagline) or the AssemblyScript Discord (http://discord.gg/assemblyscript) (#gamedev channel)
I’ve created a Button class that allows the developer to quickly create a UI button that game developers can use for simple UI interaction in their vector game. The button is just a square with some text that has a hover and click color. Two functions are passed to the Button to define the logic that is run when the mouse button is down and up over the button. Let’s put together a little app that displays a button that does something simple. First, let’s import the classes we need from vectorengine, export the VectorEngineExports and initializes the vector engine. Here’s the code:
  import { VectorEngine, Button, DisplayString, playSFX } from 'vectorengine';
  export { VectorEngineExports } from 'vectorengine';
  VectorEngine.init();
The export and VectorEngine.init call are required now in every Vector Engine
app. The export call exports the functions the JavaScript portion of Vector Engine needs
to run, and VectorEngine.init function initializes the Vector Engine AssemblyScript
code. Next I’m going to create a function to make a click sound. I created the code for this
function using my sound effects generator.
Here's the code I generated for a click sound:
  @inline function clickSound(): void {
    playSFX(4, 698, 0, 0, 0, 0, 0, 0, 0,
      0, 0, 3112, 0, 0, 0, 0.01, 1, 0, 0,
      0, 0, 1, 7, 44, 0);
  }
After that I declare a few color constants to use with the display string and the button:
  const blue: u32 = 0x99_99_ff_ff;
  const yellow: u32 = 0xff_ff_00_ff;
  const white: u32 = 0xff_ff_ff_ff;
Next I create a text and a button object. With the new game object classes, these objects will be automatically registered with the Vector Engine and render after the game logic runs:
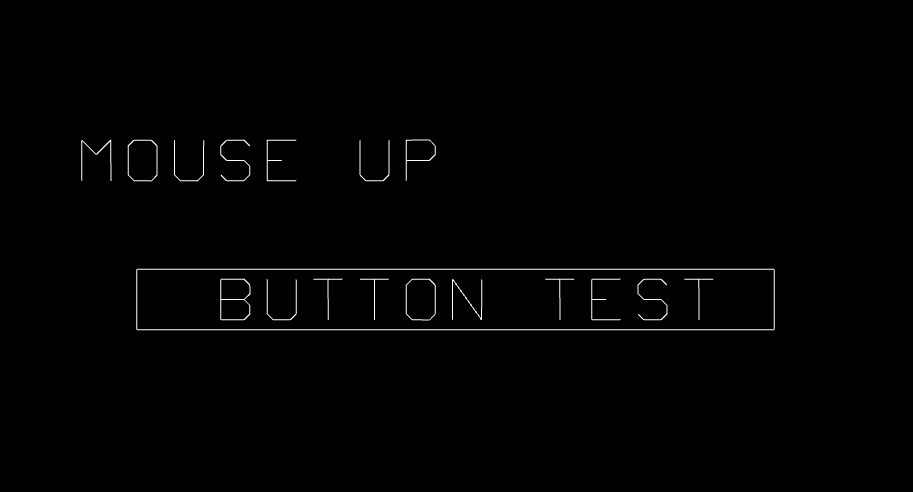
  const text = new DisplayString("mouse up or down", 0.0, 0.3, 0.05, white);

  const button = new Button("button test", 0.0, 0.0, 0.05, white, yellow, blue,
    (): void => { // on mouse down
      text.overwrite("mouse down");
      clickSound();
    },
    (): void => { // on mouse up
      text.overwrite("mouse up");
    }
  );
The DisplayString is going to start with the text "mouse up or down" because
I'm going to overwrite it with "mouse up" or "mouse down" depending on if the user is
pressing the mouse button down over the button. I create the Button object
with a label "button test", an on mouse down function that overwrites our
DisplayString with the phrase "mouse down" and triggers the click sound. The
on mouse up function overwrites the DisplayString text with the words "mouse up".
I've decided to change the name of the function I was calling gameLoop in previous
tutorials to gameLogic, the latter being a more accurate description. Right now,
the gameLogic function doesn’t really do anything as the functionality of the app
is pushed into the mouse down and mouse up functions in the Button object. Here's
that last bit of code:
  let time_count: i32 = 0;

  export function gameLogic(delta: i32): void {
    time_count += delta;
  }
HTML
The HTML file doesn't change much from previous tutorials. I changed the name of the .wasm
file, and gameLoop is now called gameLogic. Remember to serve the page from a web server,
or it won't work. Here's the HTML code I have:
  <html>

  <head>
    <style>
      body {
        background-color: #3b3b3b;
        text-align: center;
      }
    </style>

  </head>

  <body>
    <canvas width="640" height="640" id="cnvs"></canvas>
    <script type="module">
      import { runVectorGame } from "https://unpkg.com/vectorengine/lib/VectorEngine.js";

      runVectorGame("cnvs", "button.wasm", "gameLogic");
    </script>
  </body>

  </html>
When you run your app, it should look like this:

You can open the app or view the final version of the AssemblyScript code here.
(app | code)


