


Vector Engine and AssemblyScript Classes
April 30, 2021
NOTE: I skip over a lot of AssemblyScript basics in this tutorial. If you need help, please contact me on twitter (@battagline) or the AssemblyScript Discord (http://discord.gg/assemblyscript) (gamedev channel)
This tutorial is the second in my AssemblyScript / Vector Engine game development series. If
you haven't read my introductory tutorial in this series, you may
want to start there. In the previous tutorial, I showed you how
to draw loops to the canvas by calling renderLoop. The problem with calling
renderLoop directly is that you need to pass all the loop properties every
time. It is even more complicated when you want to render multiple loops for the same
object. Instead, we can declare a class that contains all of our loop data. We can have x, y,
scale, rotation, and color attributes that apply to all the loops for that game object. Doing
this can simplify our code.
Smile class
After importing DisplayString and renderLoop I declare a class
called Smile. This class has an attribute for every value I pass
into renderLoop. These public attributes are color,
x, y, rotation and scale. In addition,
it has four static arrays used to define four different loops used to render a smiley face.
These arrays are main_layer, lefteye_layer, righteye_layer,
and mouth_layer. All of these loops will be rendered within a render
method. Here is what the Smile class declaration looks like:
  import { DisplayString, renderLoop } from 'vectorengine';

  class Smile {
    public color: u32 = 0x00_ff_00_ff;
    public x: f32 = 0.0;
    public y: f32 = 0.0;
    public rotation: f32 = 0.0;
    public scale: f32 = 0.0;

    private main_layer: StaticArray<f32> =
      [-0.125, 0.609375, 0.125, 0.609375, 0.375, 0.5,
        0.5, 0.375, 0.625, 0.125, 0.6328125, -0.1328125,
        0.5078125, -0.3828125, 0.3828125, -0.5078125, 0.125, -0.625,
      -0.125, -0.625, -0.3671875, -0.5078125, -0.4765625, -0.3828125,
      -0.6171875, -0.1328125, -0.6171875, 0.1171875, -0.4921875, 0.3671875,
      -0.3671875, 0.4921875,];

    private lefteye_layer: StaticArray<f32> = [
      -0.34375, 0.24375, -0.28125, 0.275, -0.21875, 0.275,
      -0.15625, 0.24375, -0.125, 0.18125, -0.125, 0.11875,
      -0.15625, 0.05625, -0.21875, 0.025, -0.28125, 0.025,
      -0.34375, 0.05625, -0.375, 0.103125, -0.375, 0.18125,];

    private righteye_layer: StaticArray<f32> = [
      0.34375, 0.24375, 0.28125, 0.275, 0.21875, 0.275,
      0.15625, 0.24375, 0.125, 0.18125, 0.125, 0.11875,
      0.15625, 0.05625, 0.21875, 0.025, 0.28125, 0.025,
      0.34375, 0.05625, 0.375, 0.103125, 0.375, 0.18125,];

    private mouth_layer: StaticArray<f32> = [
      -0.375, -0.171875, 0.375, -0.171875, 0.3125, -0.375,
      0.125, -0.5, -0.125, -0.5, -0.3125, -0.375,];


    public render(): void {
      renderLoop(this.main_layer, this.x, this.y, this.color, this.rotation, this.scale);
      renderLoop(this.lefteye_layer, this.x, this.y, this.color, this.rotation, this.scale);
      renderLoop(this.righteye_layer, this.x, this.y, this.color, this.rotation, this.scale);
      renderLoop(this.mouth_layer, this.x, this.y, this.color, this.rotation, this.scale);
    }
  }
Creating Smile Objects
Once the class is declared, we need to create some objects using the Smile class.
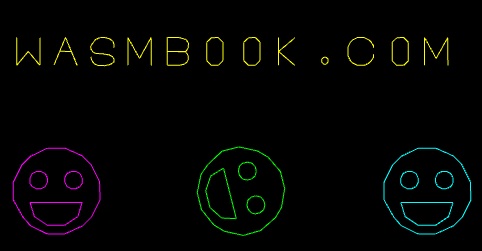
I'm going to make three smile objects, each with a scale of 0.15. They will have different x
positions and colors. Here is the code that makes those three smile objects:
  var smile = new Smile();
  smile.scale = 0.15;

  var smile_left = new Smile();
  smile_left.x = -0.4;
  smile_left.color = 0xff_00_ff_ff;
  smile_left.scale = 0.15;

  var smile_right = new Smile();
  smile_right.x = 0.4;
  smile_right.color = 0x00_ff_ff_ff;
  smile_right.scale = 0.15;


  let timeChange: f32 = 0.0;
  const wasmBook = new DisplayString("WasmBook.com", 0.0, 0.3, 0.04, 0xff_ff_00_ff);
After defining the smile objects, the code above creates a timeChange variable
and a DisplayString constant called wasmBook. After these global
variables are declared, we will create the game loop.
The Game Loop
The game loop uses the timeChange variable to modify the rotation attribute for one
smiley faces. I render the other two smiley faces without adjusting the attributes. I also
render the wasmBook DisplayText constant. Here is that code:
  export function gameLoop(delta: i32): void {
    timeChange += <f32>delta / 1000.0;

    smile.rotation = timeChange;
    smile.render();
    smile_left.render();
    smile_right.render();

    wasmBook.render();
}
Compile and run
Now you can compile the Wasm binary using the following asc command:
asc class.ts --importMemory -Oz -o class.wasm
HTML
The HTML file that runs this application is almost identical to the code used in the initial
Vector Engine tutorial. The only difference is the name of the
Wasm file, which is class.wasm in this file, and was helloworld.wasm in
the previous. Here is that HTML code:
  <html>

  <head>
    <style>
      body {
        background-color: #3b3b3b;
        text-align: center;
      }
      </style>

  </head>

  <body>
    <canvas width="640" height="640" id="cnvs"></canvas>
    <script type="module">
      import { runVectorGame } from "https://unpkg.com/vectorengine/lib/VectorEngine.js";

      runVectorGame("cnvs", "class.wasm", "gameLoop", 1);
    </script>
  </body>

  </html>
Keep in mind that you need to serve this file from a web server for it to work. If you try to open the file directly in a web browser, it will throw an error when it tries to load the Wasm file. When you run your web browser and use it to serve the app, it should look something like this:
You can view a working version of the application here. You can also see what the completed AssemblyScript code looks like here. (AssemblyScript code | view application)
The Art of WebAssembly
Author and expert Rick Battagline eases the reader through Wasm's complexities using
clear explanations, illustrations, & plenty of examples.
Learn More

Hands-On Game Dev with Wasm
Author and expert Rick Battagline teaches 2D game development fundamentals in C++
using the Emscripten WebAssembly toolchain.
Learn More
ClassicSolitaire.com
Are you bored right now? Play Classic Solitaire and be slightly less bored. Also, it's how
I earn a living, so it would really help me out if you wasted time on my site. :-)
Play Solitaire