


Mouse Controls with Vector Engine and AssemblyScript
May 1, 2021
NOTE: I skip over a lot of AssemblyScript basics in this tutorial. If you need help, please contact me on twitter (@battagline) or the AssemblyScript Discord (http://discord.gg/assemblyscript) (#gamedev channel)
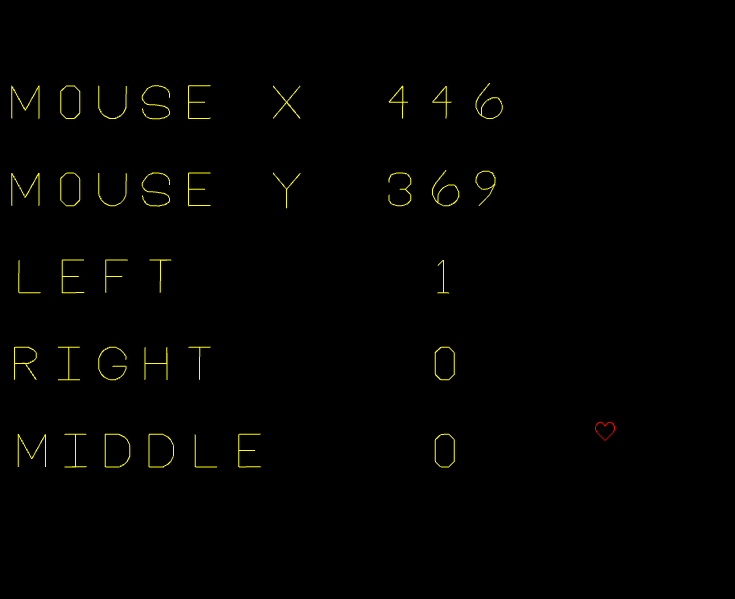
If you've read my earlier tutorials, you should know how to render vectors to the canvas using AssemblyScript/Wasm and the Vector Engine vector rendering engine. This tutorial will show you how to receive input from the mouse using Vector Engine, and use that input to change what you render to the canvas. By the end, you should have an app that displays the mouse x and y coordinates relative to the canvas and what mouse buttons you've pressed.
I'm going to start by importing three classes and the renderLoop function.
The classes are DisplayString, DisplayNum and Input.
The DisplayString class is used to render a string to the canvas.
The DispalyNum class renders an integer number to the canvas. This can be used
for scores, but in our case will be used to render the mouse coodinates. Finally,
the Input class will be used to detect the x and y mouse coordinates, as well as
whether or not any mouse buttens are pressed.
import { DisplayString, DisplayNum, Input, renderLoop } from 'vectorengine';
The Heart
After importing our classes and function from vectorengine, I will define
a static array for a heart vector loop. This will be the same StaticArray values
used in earlier tutorials.
  const heartLoop: StaticArray<f32> =
    [
      // x, y
      0, 0.4375, // first point
      0.125, 0.625, // second point
      0.2578125, 0.7421875, // third point...
      0.375, 0.796875,
      0.5, 0.796875,
      0.625, 0.75,
      0.7578125, 0.6171875,
      0.875, 0.375,
      0.875, 0.125,
      0.75, -0.125,
      0, -0.875,
      -0.75, -0.125,
      -0.875, 0.125,
      -0.875, 0.375,
      -0.7421875, 0.6171875,
      -0.625, 0.75,
      -0.5, 0.796875,
      -0.375, 0.796875,
      -0.25, 0.75,
      -0.125, 0.625,];
String and Number Display Constants
After defining the heart loop in a static array, I initialize the input and create a series
of DisplayString objects and DisplayNum objects to show the mouse
values coming from the Input class. Here is that code:
  Input.init(); // don't forget to initialize your input.

  const mouse_x: DisplayString = new DisplayString("Mouse X ", -0.56, 0.6, 0.05, 0xff_ff_00_ff);
  const mouse_x_num: DisplayNum = new DisplayNum(0, 3, 0.0, 0.6, 0.05, 0xff_ff_00_ff);
  const mouse_y: DisplayString = new DisplayString("Mouse Y ", -0.56, 0.4, 0.05, 0xff_ff_00_ff);
  const mouse_y_num: DisplayNum = new DisplayNum(0, 3, 0.0, 0.4, 0.05, 0xff_ff_00_ff);

  const left_button: DisplayString = new DisplayString("Left ", -0.70, 0.2, 0.05, 0xff_ff_00_ff);
  const left_num: DisplayNum = new DisplayNum(0, 1, 0.0, 0.2, 0.05, 0xff_ff_00_ff);
  const right_button: DisplayString = new DisplayString("Right ", -0.66, 0.0, 0.05, 0xff_ff_00_ff);
  const right_num: DisplayNum = new DisplayNum(0, 1, 0.0, 0.0, 0.05, 0xff_ff_00_ff);
  const middle_button: DisplayString = new DisplayString("Middle ", -0.595, -0.2, 0.05, 0xff_ff_00_ff);
  const middle_num: DisplayNum = new DisplayNum(0, 1, 0.0, -0.2, 0.05, 0xff_ff_00_ff);
The Game Loop
After creating the objects, that will display the mouse data, I begin the game loop by converting
the Input.MouseX and Input.MouseY values into canvas coodinate integers.
  export function gameLoop(delta: i32): void {

    let x: i32 = 320 + <i32>(Input.MouseX * 320.0);
    let y: i32 = 320 - <i32>(Input.MouseY * 320.0);
    mouse_x_num.num = x;
    mouse_y_num.num = y;
Next, we render the DisplayText objects for the mouse_x, mouse_y,
left_button, right_button, and middle_button. There
are the text labels for the numeric mouse values we will render later.
  mouse_x.render();
  mouse_y.render();

  left_button.render();
  right_button.render();
  middle_button.render();
I set the numeric values for left_num, right_num,
and middle_num using Input.MouseLeftButton,
Input.MouseRightButton, and Input.MouseMiddleButton respectively.
The Input button values are boolean values (true or false) and must be cast
to i32 integers before it is displayed. The result will display a 1 if you
press the mouse button and 0 if you don't.
  left_num.num = <i32>Input.MouseLeftButton;
  right_num.num = <i32>Input.MouseRightButton;
  middle_num.num = <i32>Input.MouseMiddleButton;
Finally, I then need to render all the mouse-related numbers, and the heart loop.
    mouse_x_num.render();
    mouse_y_num.render();

    left_num.render();
    right_num.render();
    middle_num.render();

    renderLoop(heartLoop, Input.MouseX, Input.MouseY, 0xff_00_00_ff, 0.0, 0.05);
  }
HTML
The HTML file doesn't change much from previous tutorials. The only thing that needs to be different is the name of the .wasm file. Remember to serve the page from a web server, or it won't work. Here's the HTML code I have:
<html>

<head>
  <style>
    body {
      background-color: #3b3b3b;
      text-align: center;
    }
  </style>

</head>

<body>
  <canvas width="640" height="640" id="cnvs"></canvas>
  <script type="module">
    import { runVectorGame } from "https://unpkg.com/vectorengine/lib/VectorEngine.js";

    runVectorGame("cnvs", "mouse.wasm", "gameLoop");
  </script>
</body>

</html>
When you run your app, it should look like this:
You can open the app or view the final version of the AssemblyScript code here.
(app | code)
The Art of WebAssembly
Author and expert Rick Battagline eases the reader through Wasm's complexities using
clear explanations, illustrations, & plenty of examples.
Learn More

Hands-On Game Dev with Wasm
Author and expert Rick Battagline teaches 2D game development fundamentals in C++
using the Emscripten WebAssembly toolchain.
Learn More

ClassicSolitaire.com
Are you bored right now? Play Classic Solitaire and be slightly less bored. Also, it's how
I earn a living, so it would really help me out if you wasted time on my site. :-)
Play Solitaire